By: AY1920S1-CS2103T-T10-3 Since: Sep 2019 Licence: MIT
- 1. Setting up
- 2. Design
- 3. Implementation
- 3.1. Add Task/Event feature
- 3.2. Rescheduling of recurring Events automatically
- 3.3. Game feature
- 3.4. [Implemented] Undo/Redo Feature
- 3.5. [Previous] Undo/Redo feature
- 3.6. Priority Mode
- 3.7. Add Task/Event feature
- 3.8. Rescheduling of recurring Events automatically
- 3.9. Add Reminder feature
- 3.10. Snooze Reminder feature
- 3.11. Logging
- 3.12. Configuration
- 4. Documentation
- 5. Testing
- 6. Dev Ops
- Appendix A: Product Scope
- Appendix B: User Stories
- Appendix C: Use Cases
- Appendix D: Non Functional Requirements
- Appendix E: Glossary
- Appendix F: Product Survey
- Appendix G: Instructions for Manual Testing
1. Setting up
Refer to the guide here.
2. Design
2.1. Architecture
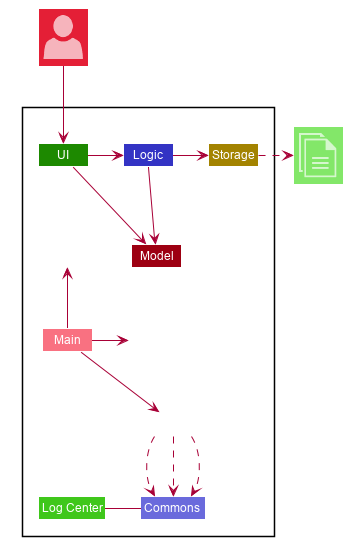
The Architecture Diagram given above explains the high-level design of the App. Given below is a quick overview of each component.
The .puml files used to create diagrams in this document can be found in the diagrams folder.
Refer to the Using PlantUML guide to learn how to create and edit diagrams.
|
-
At app launch: Initializes the components in the correct sequence, and connects them up with each other.
-
At shut down: Shuts down the components and invokes cleanup method where necessary.
Commons represents a collection of classes used by multiple other components.
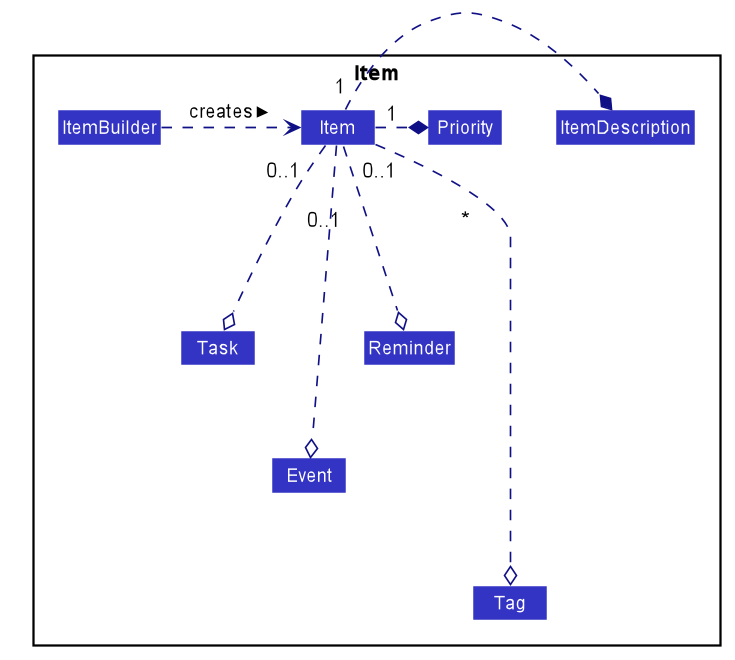
The following class plays an important role at the architecture level:
-
Item: Used by classes to represent a task, event, reminder or any combination of the three. -
Task: Used by classes to store, access and modify details regarding tasks. -
Events: Used by classes to store, access and modify details regarding events. -
Reminders: Used by classes to store, access and modify details regarding reminders. -
LogsCenter: Used by many classes to write log messages to the App’s log file.
-
An
Itemcan contain an task, event or reminder. However it must contain at least one of the three. -
The
ItemBuilderclass ensures the validation of the above rule whenbuild()is called.. -
An
Itemis immutable in order to support thread safety. -
An
Itemis created via the ItemBuilder class. -
Setter methods of
Itemcreate a newItemthroughItemBuilderto ensure immutability.
The rest of the App consists of four components.
Each of the four components
-
Defines its API in an
interfacewith the same name as the Component. -
Exposes its functionality using a
{Component Name}Managerclass.
For example, the Logic component (see the class diagram given below) defines it’s API in the Logic.java interface and exposes its functionality using the LogicManager.java class.
How the architecture components interact with each other
The Sequence Diagram below shows how the components interact with each other for the scenario where the user issues the command delete 1.
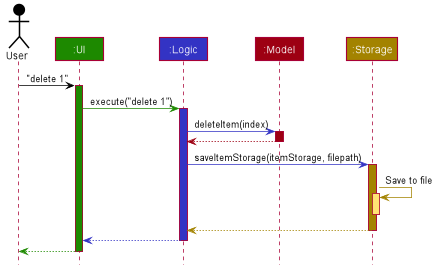
delete 1 commandThe sections below give more details of each component.
2.2. UI component
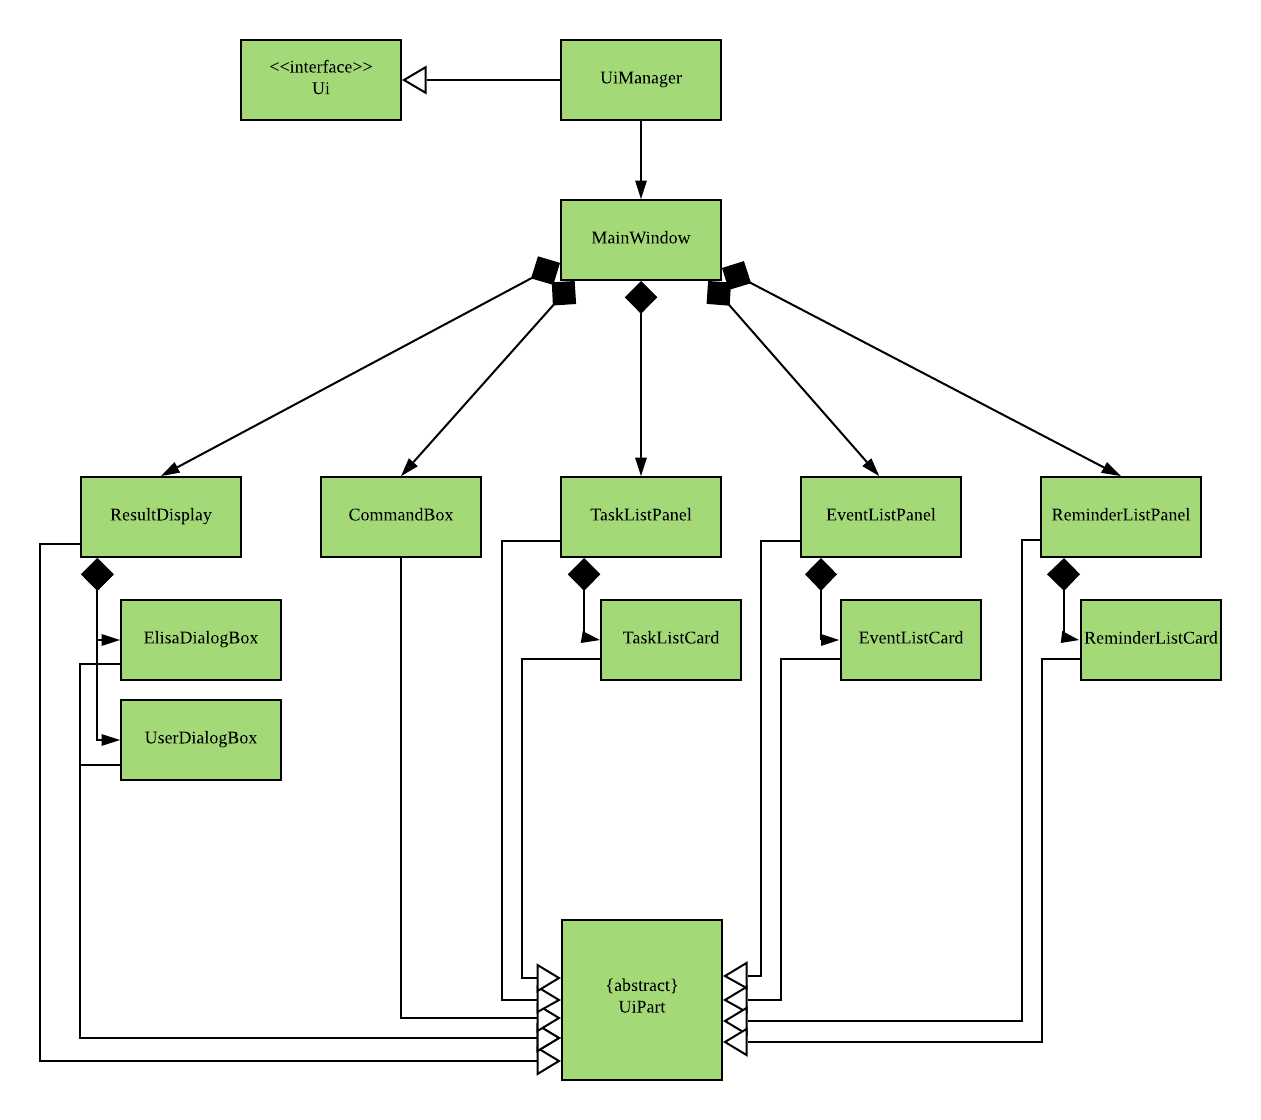
API : Ui.java
The UI consists of a MainWindow that is made up of parts e.g.CommandBox, ResultDisplay, TaskListPanel etc. All these, including the MainWindow, inherit from the abstract UiPart class.
The UI component uses JavaFx UI framework. The layout of these UI parts are defined in matching .fxml files that are in the src/main/resources/view folder. For example, the layout of the MainWindow is specified in MainWindow.fxml
The UI component,
-
Executes user commands using the
Logiccomponent. -
Listens for changes to
Modeldata so that the UI can be updated with the modified data.
2.3. Logic component
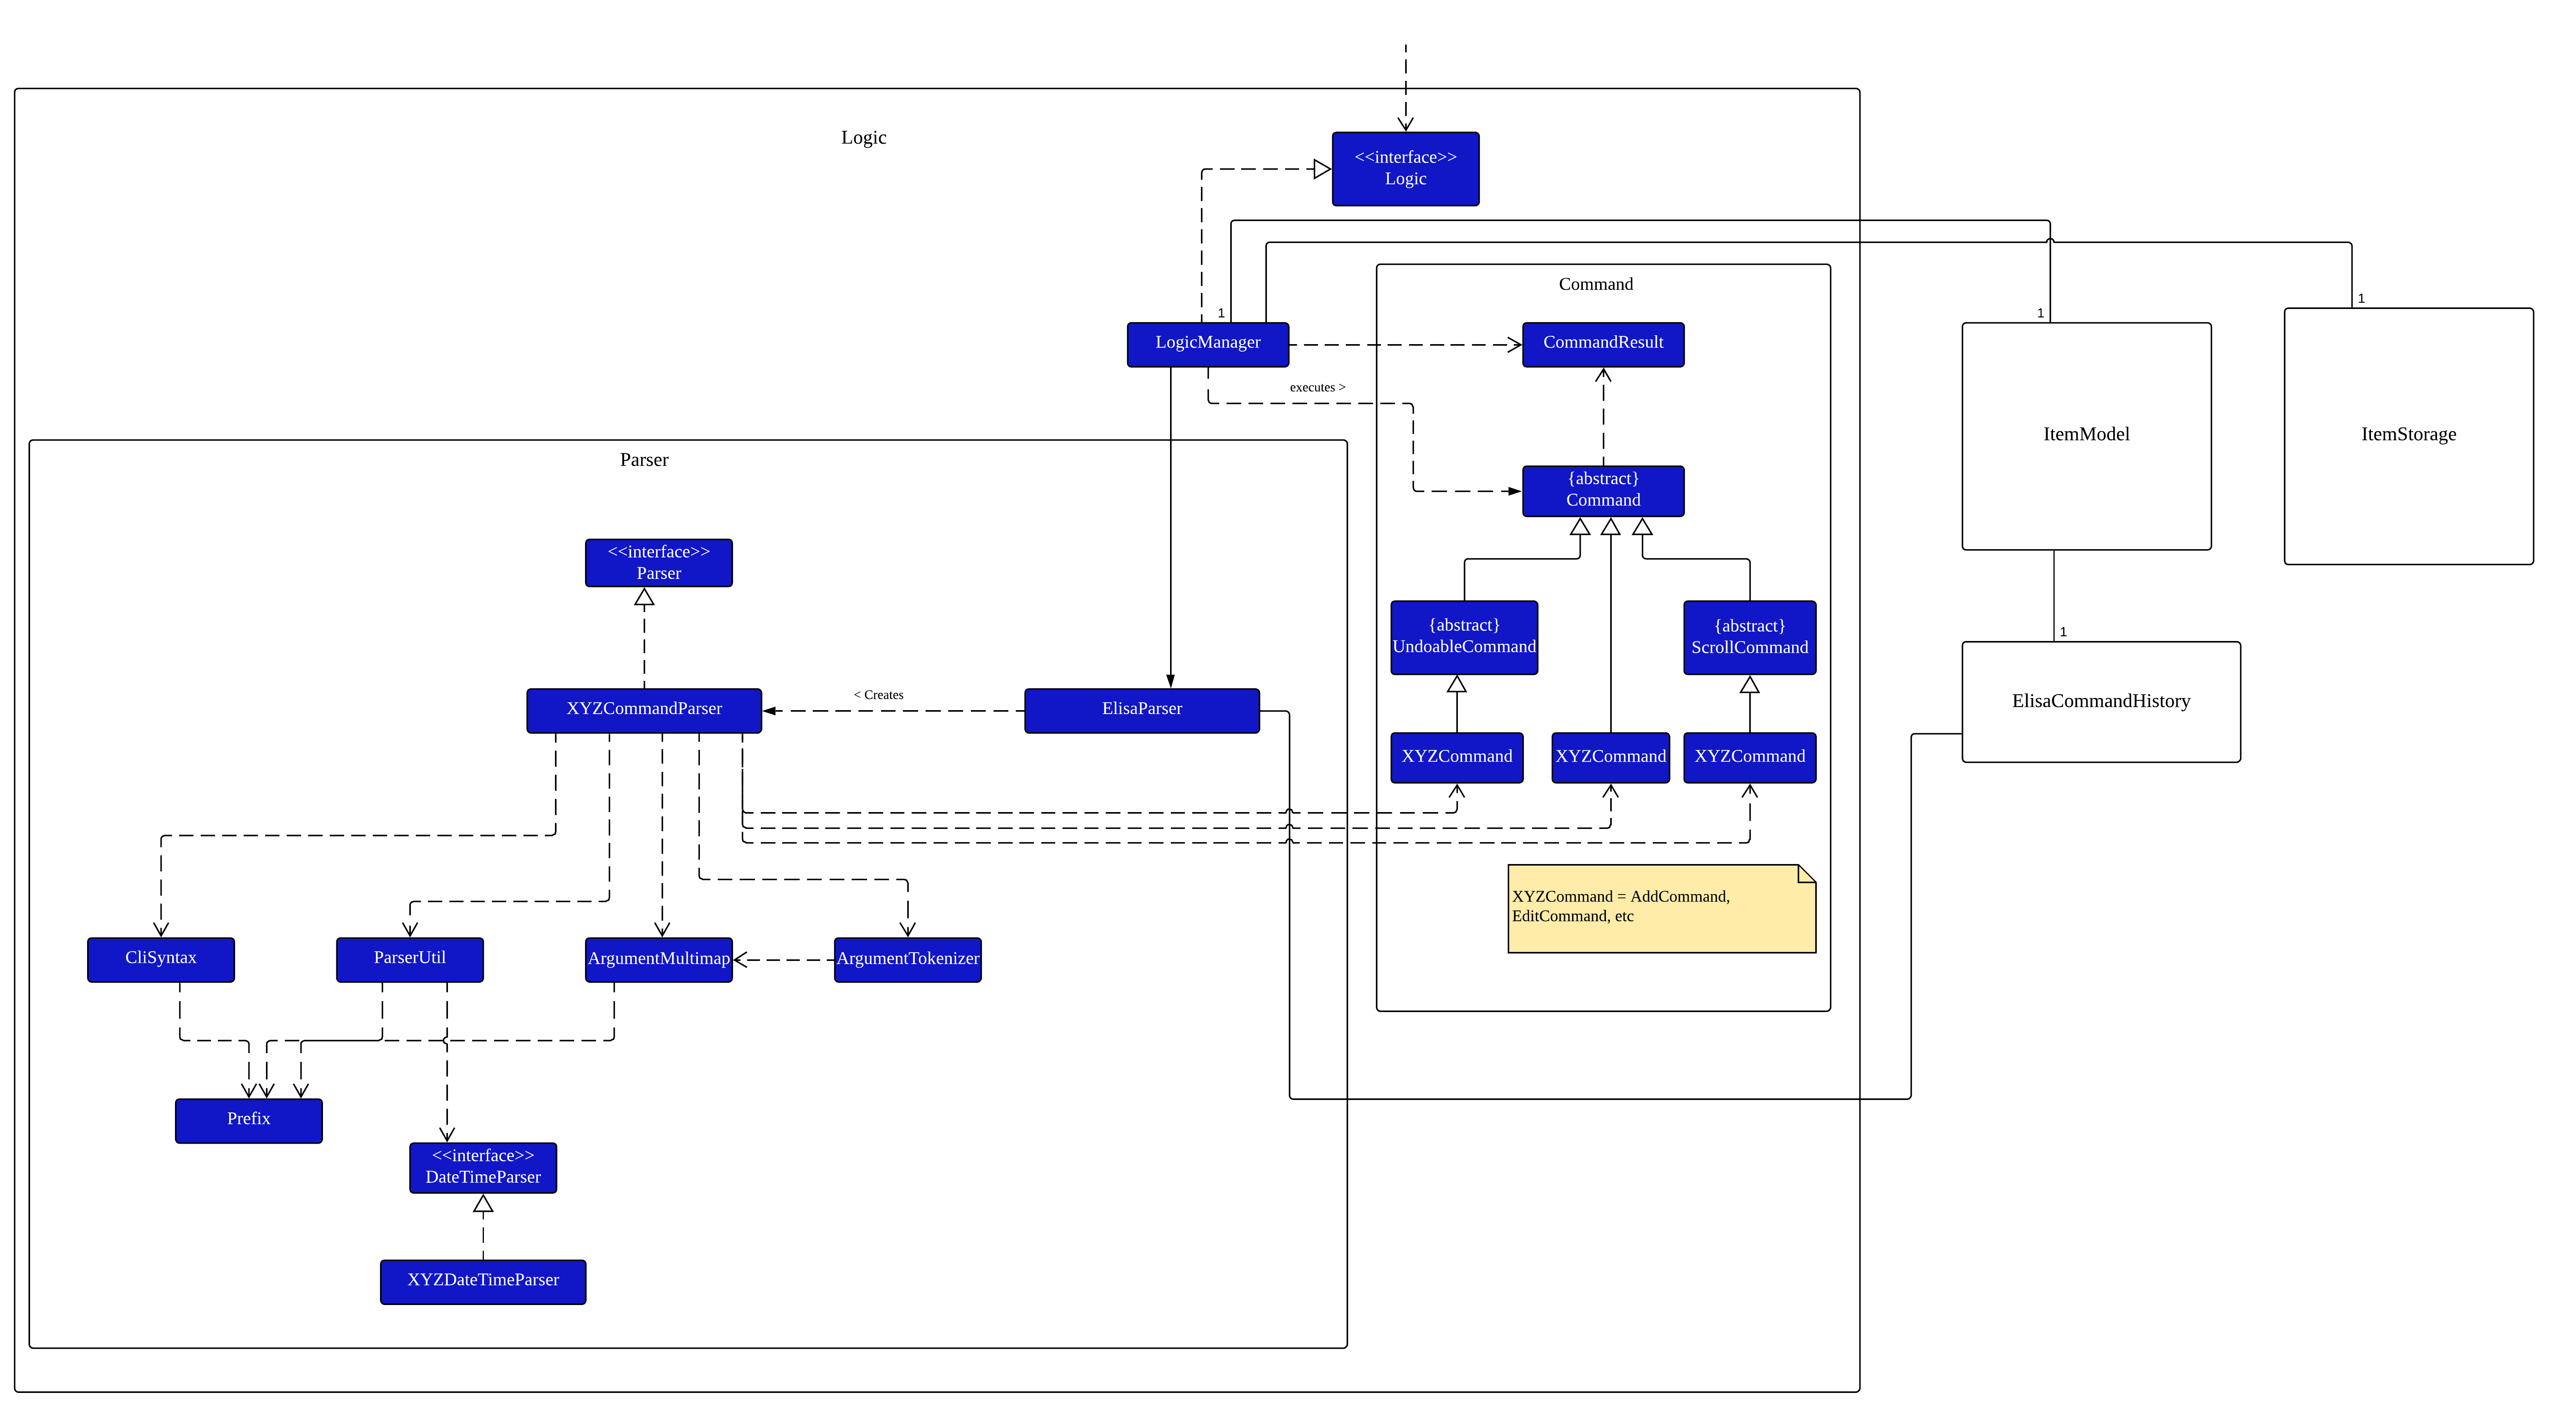
API :
Logic.java
-
Logicuses theElisaParserclass to parse the user command. -
This results in a
Commandobject which is executed by theLogicManager. -
The command execution can affect the
ItemModel(e.g. adding an Item). -
The result of the command execution is encapsulated as a
CommandResultobject which is passed back to theUi. -
In addition, the
CommandResultobject can also instruct theUito perform certain actions, such as displaying help to the user. -
More instructions for the
Uican be given through implementingScrollCommand
2.4. Model component
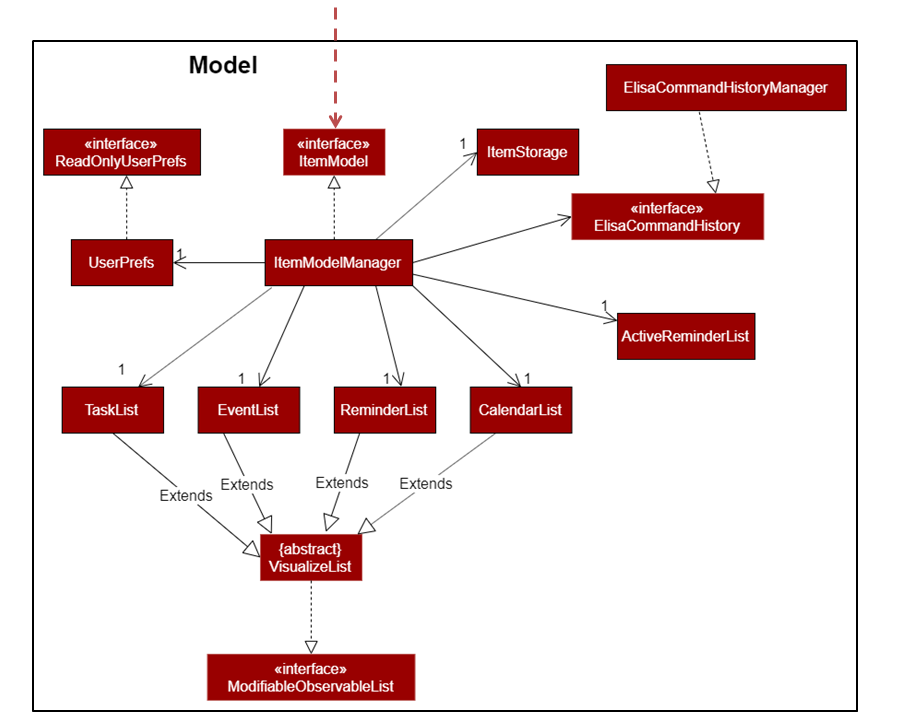
API : ItemModel.java
The ItemModel,
-
stores a
UserPrefobject that represents the user’s preferences. -
contains the
ItemStoragethat stores all the data for ELISA. -
exposes four observable lists that can be viewed by the
Uiand will cause an update in theUiwhen it is updated.
2.4.1. Design Consideration
The original implementation was to have one single observable list and modifying it whenever the view changes. We decided against it as we believe that this will result in O(n) time complexity for switching the different views as we need to iterate through all the items to find the relevant items.
Using the four visualization list, we only need to change the pointer when we want to change the view of the viewing panel making it an O(1) time complexity solution. However, this makes it more complicated to maintain the different lists.
2.5. Storage component
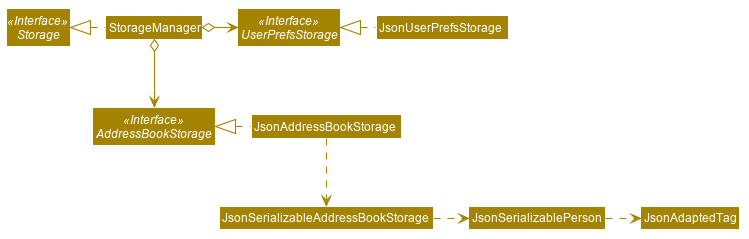
API : Storage.java
The Storage component,
-
can save
UserPrefobjects in json format and read it back. -
can save the Item Storage data in json format and read it back.
2.6. Common classes
Classes used by multiple components are in the seedu.addressbook.commons package.
3. Implementation
This section describes some noteworthy details on how certain features are implemented.
3.1. Add Task/Event feature
Task, Events and Reminders are all Items and can be added using the same command. Adding of Items is facilitated by ItemModel#add(Item).
3.1.1. Implementation
A Task with a deadline flag -d will be considered an Event. A Task with a reminder flag -r will be considered a Reminder.
The following activity diagram shows the how a task can be added, depending on the flags present:
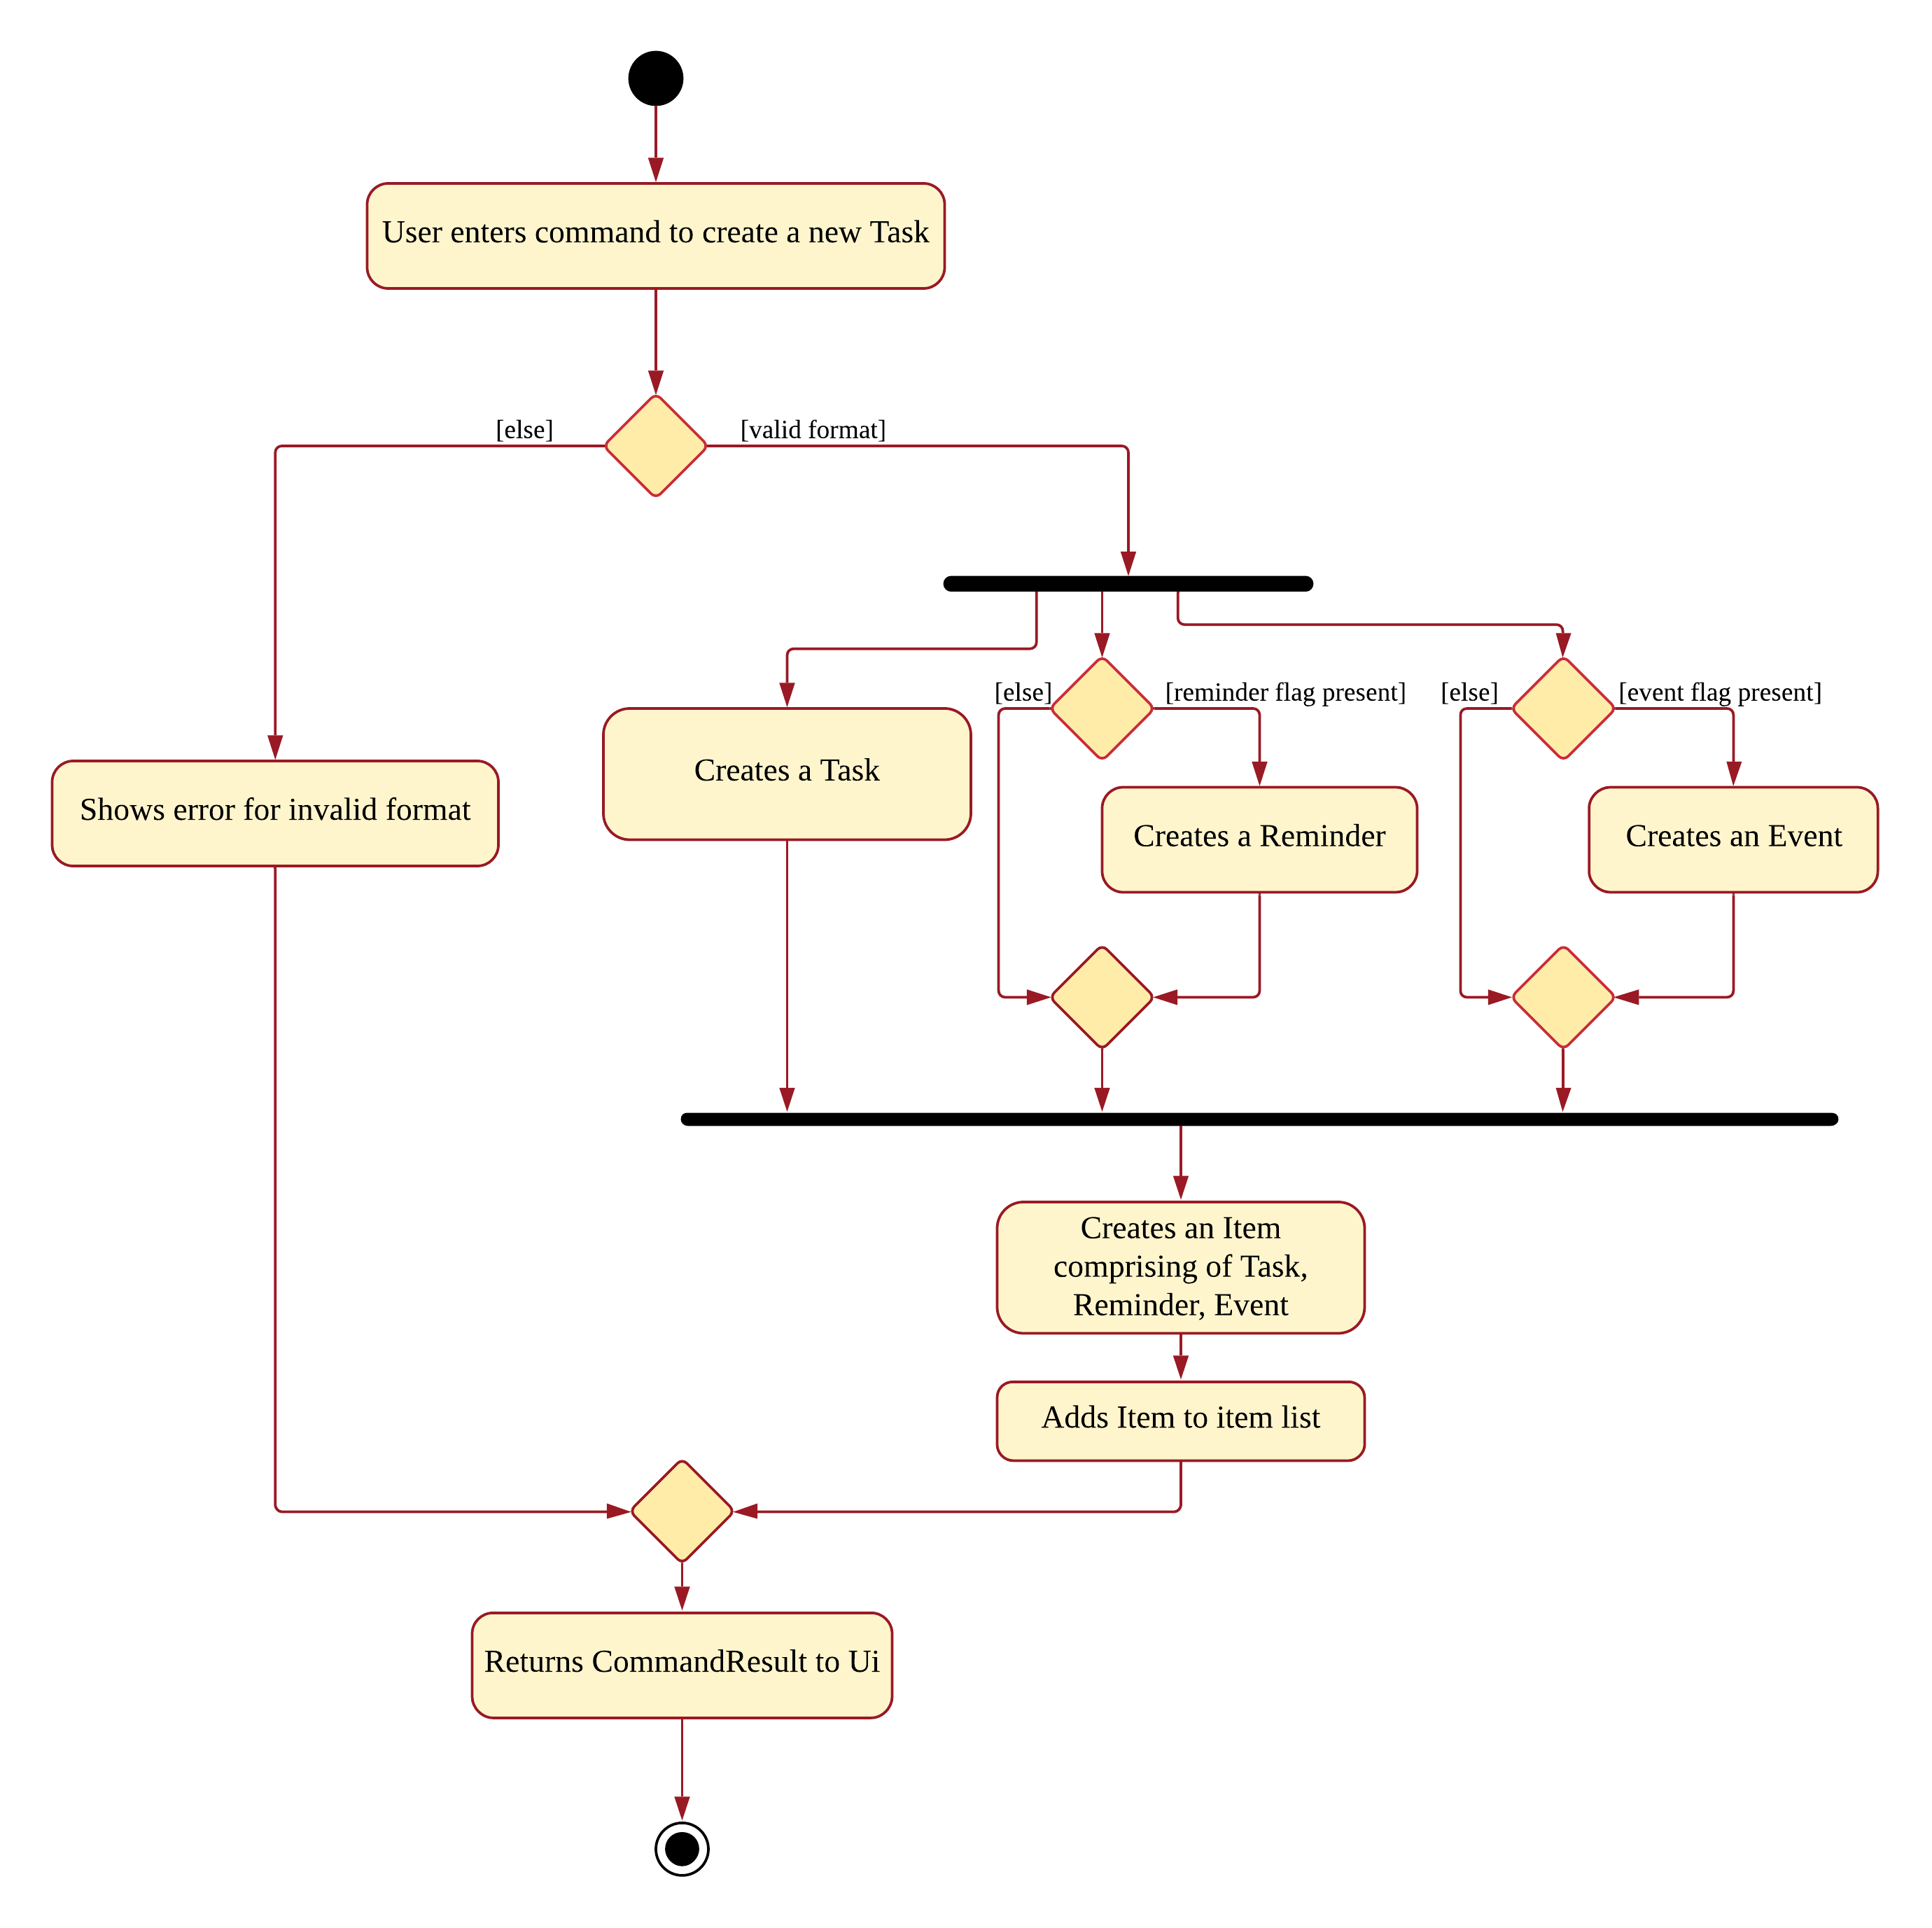
This shows how we can easily add Task, Event and Reminder with a single command. However, in this section, we will only show how Task and Event is added. Adding of Reminders is shown in a separate section as it includes other steps.
3.1.2. Internal workings of the command
Given below is an example usage scenario of how add behaves at each step:
Step 1. The user enters the command "task shower -d 1.hour.later".
Step 2. The LogicManager creates an AddressBookParser to parse the user input.
Step 3. AddressBookParser creates a AddTaskCommandParser which parses the input and returns an AddCommand.
Step 4. LogicManager will execute the AddCommand. AddCommand will then invoke ItemModel#add(Item), which adds Task to its TaskList and Event to its EventList.
Step 5. AddCommand will also trigger a change in view by calling ItemModel#setVisualList(taskList)
Step 6. Upon the successful execution of AddCommand, a CommandResult is returned to the LogicManager, which will then be returned to the Ui to render the appropriate view.
The figures below shows the sequence diagram on what happens from a simple execution of task shower -d 1.min.later user command:
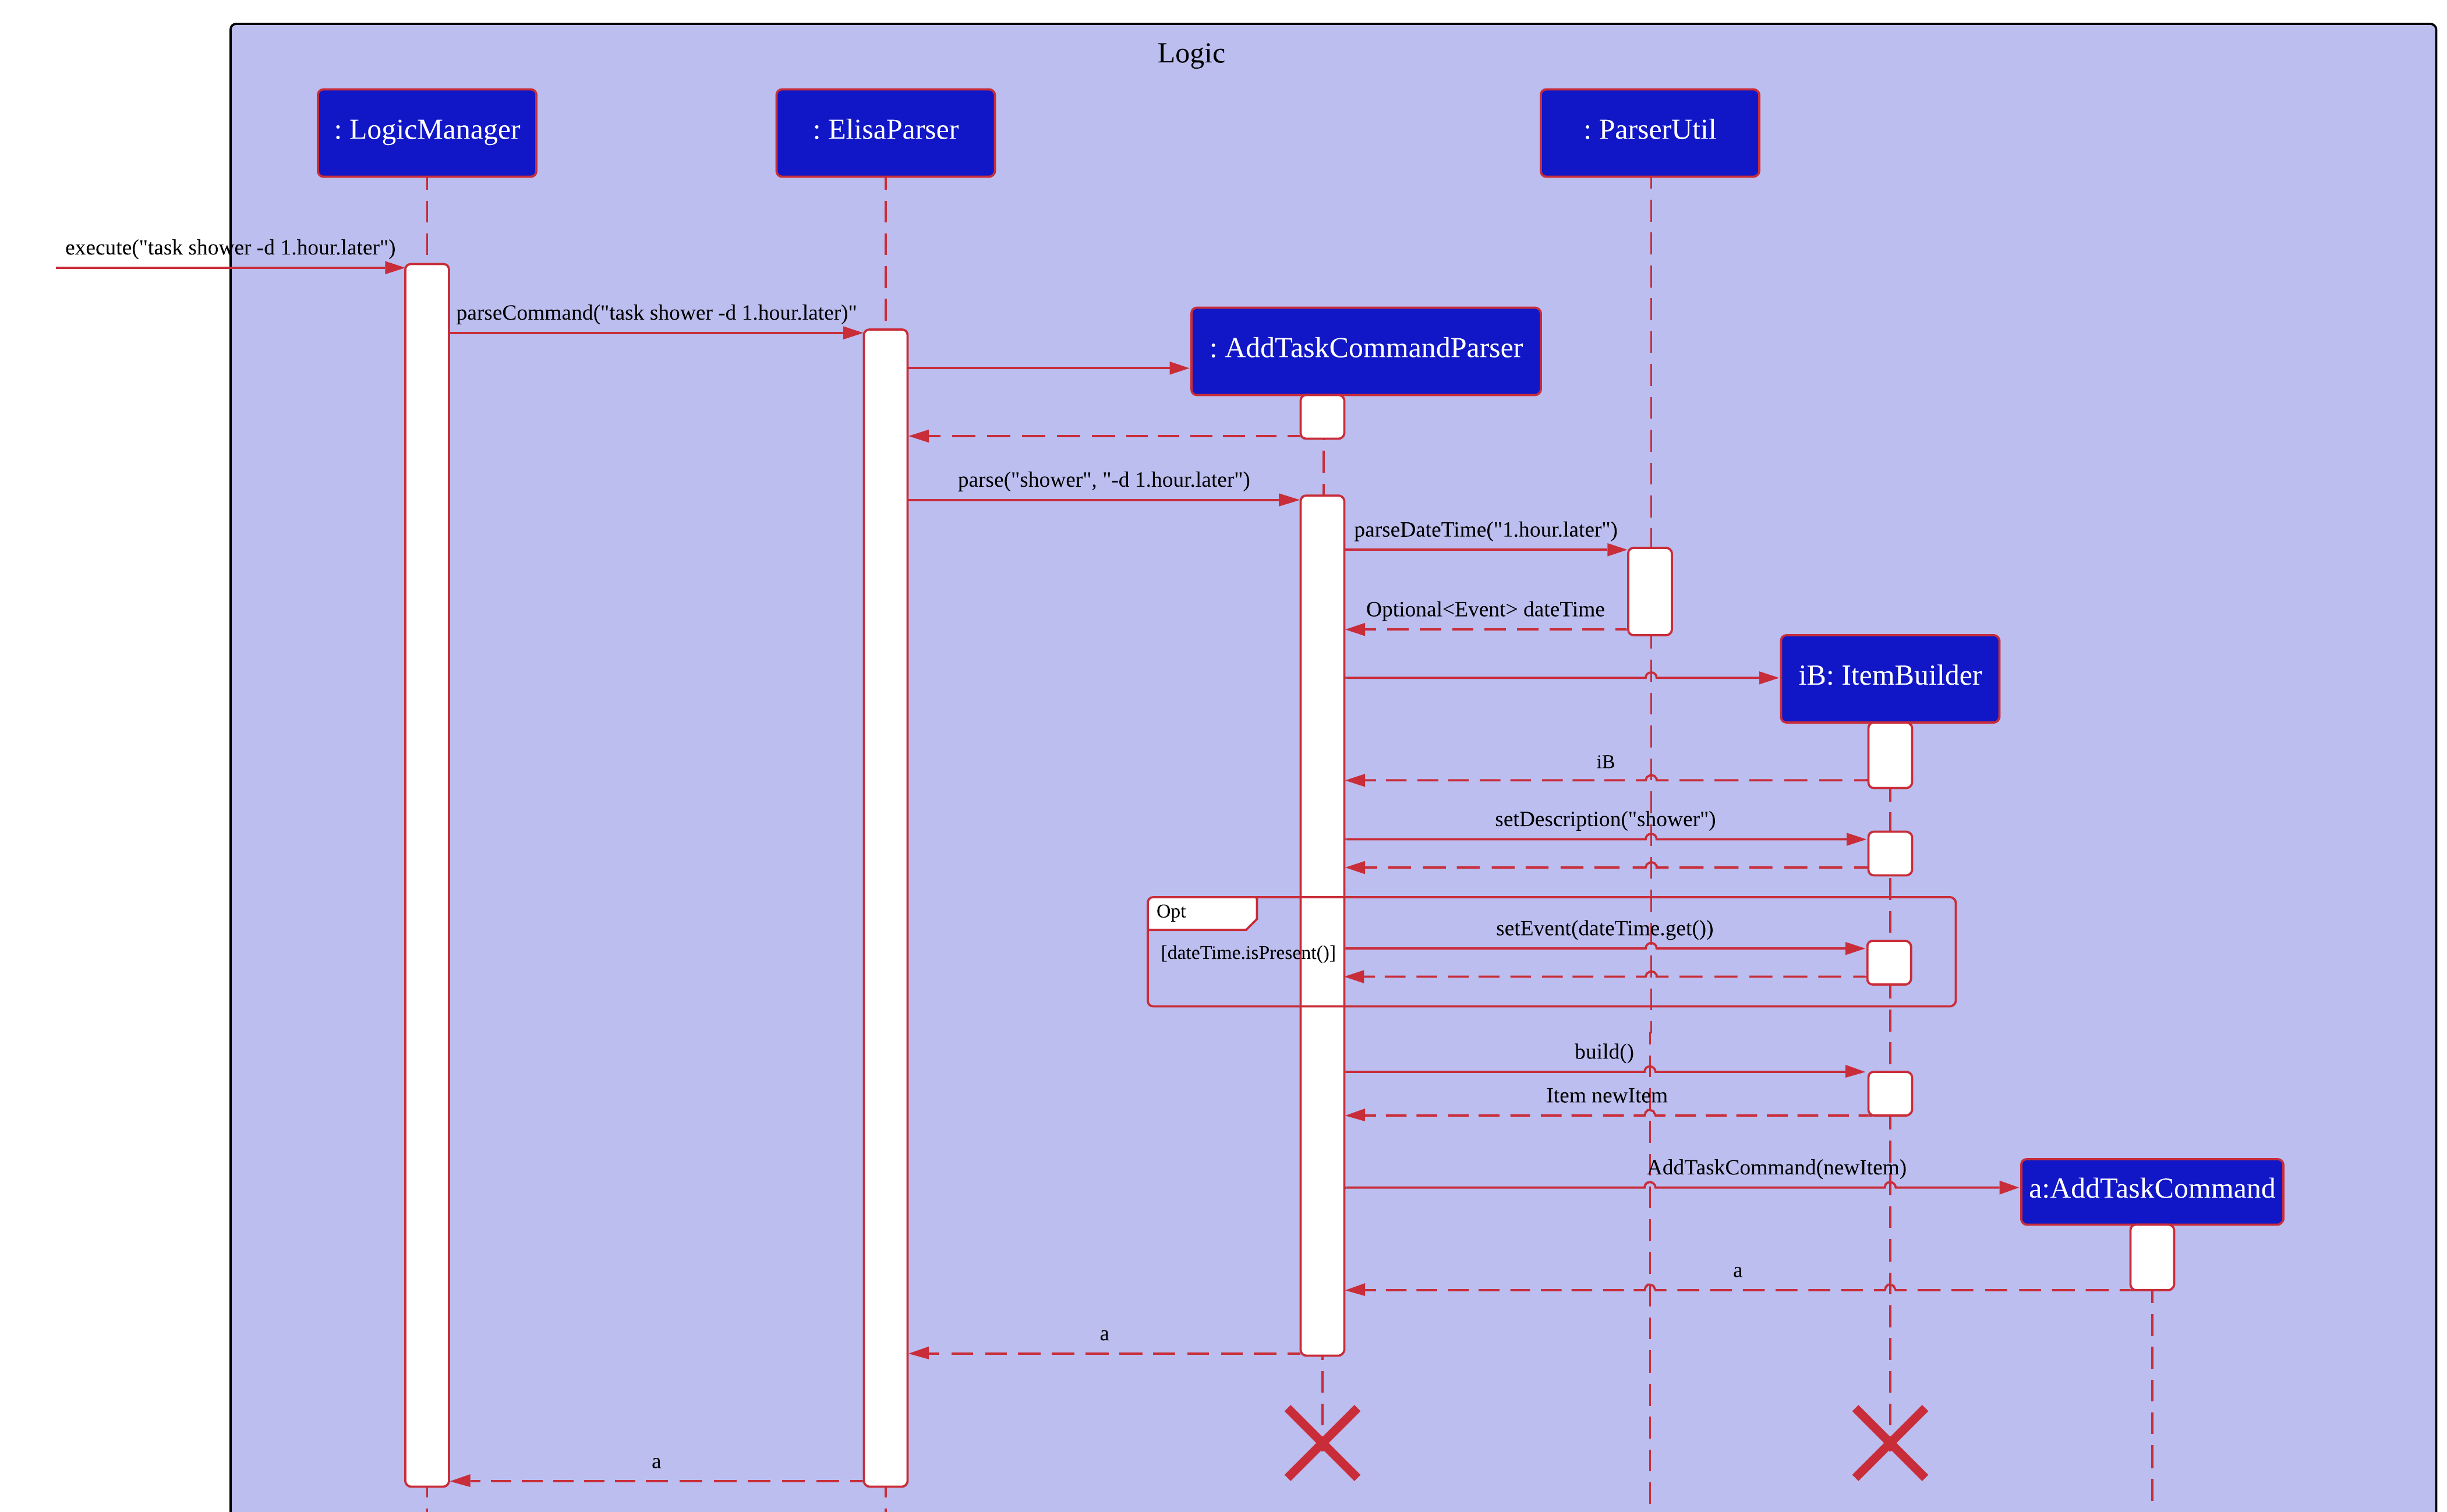
This diagram shows how execute is carried out in the Logic component.
The following diagram shows how the same command is continued onto the Model component:
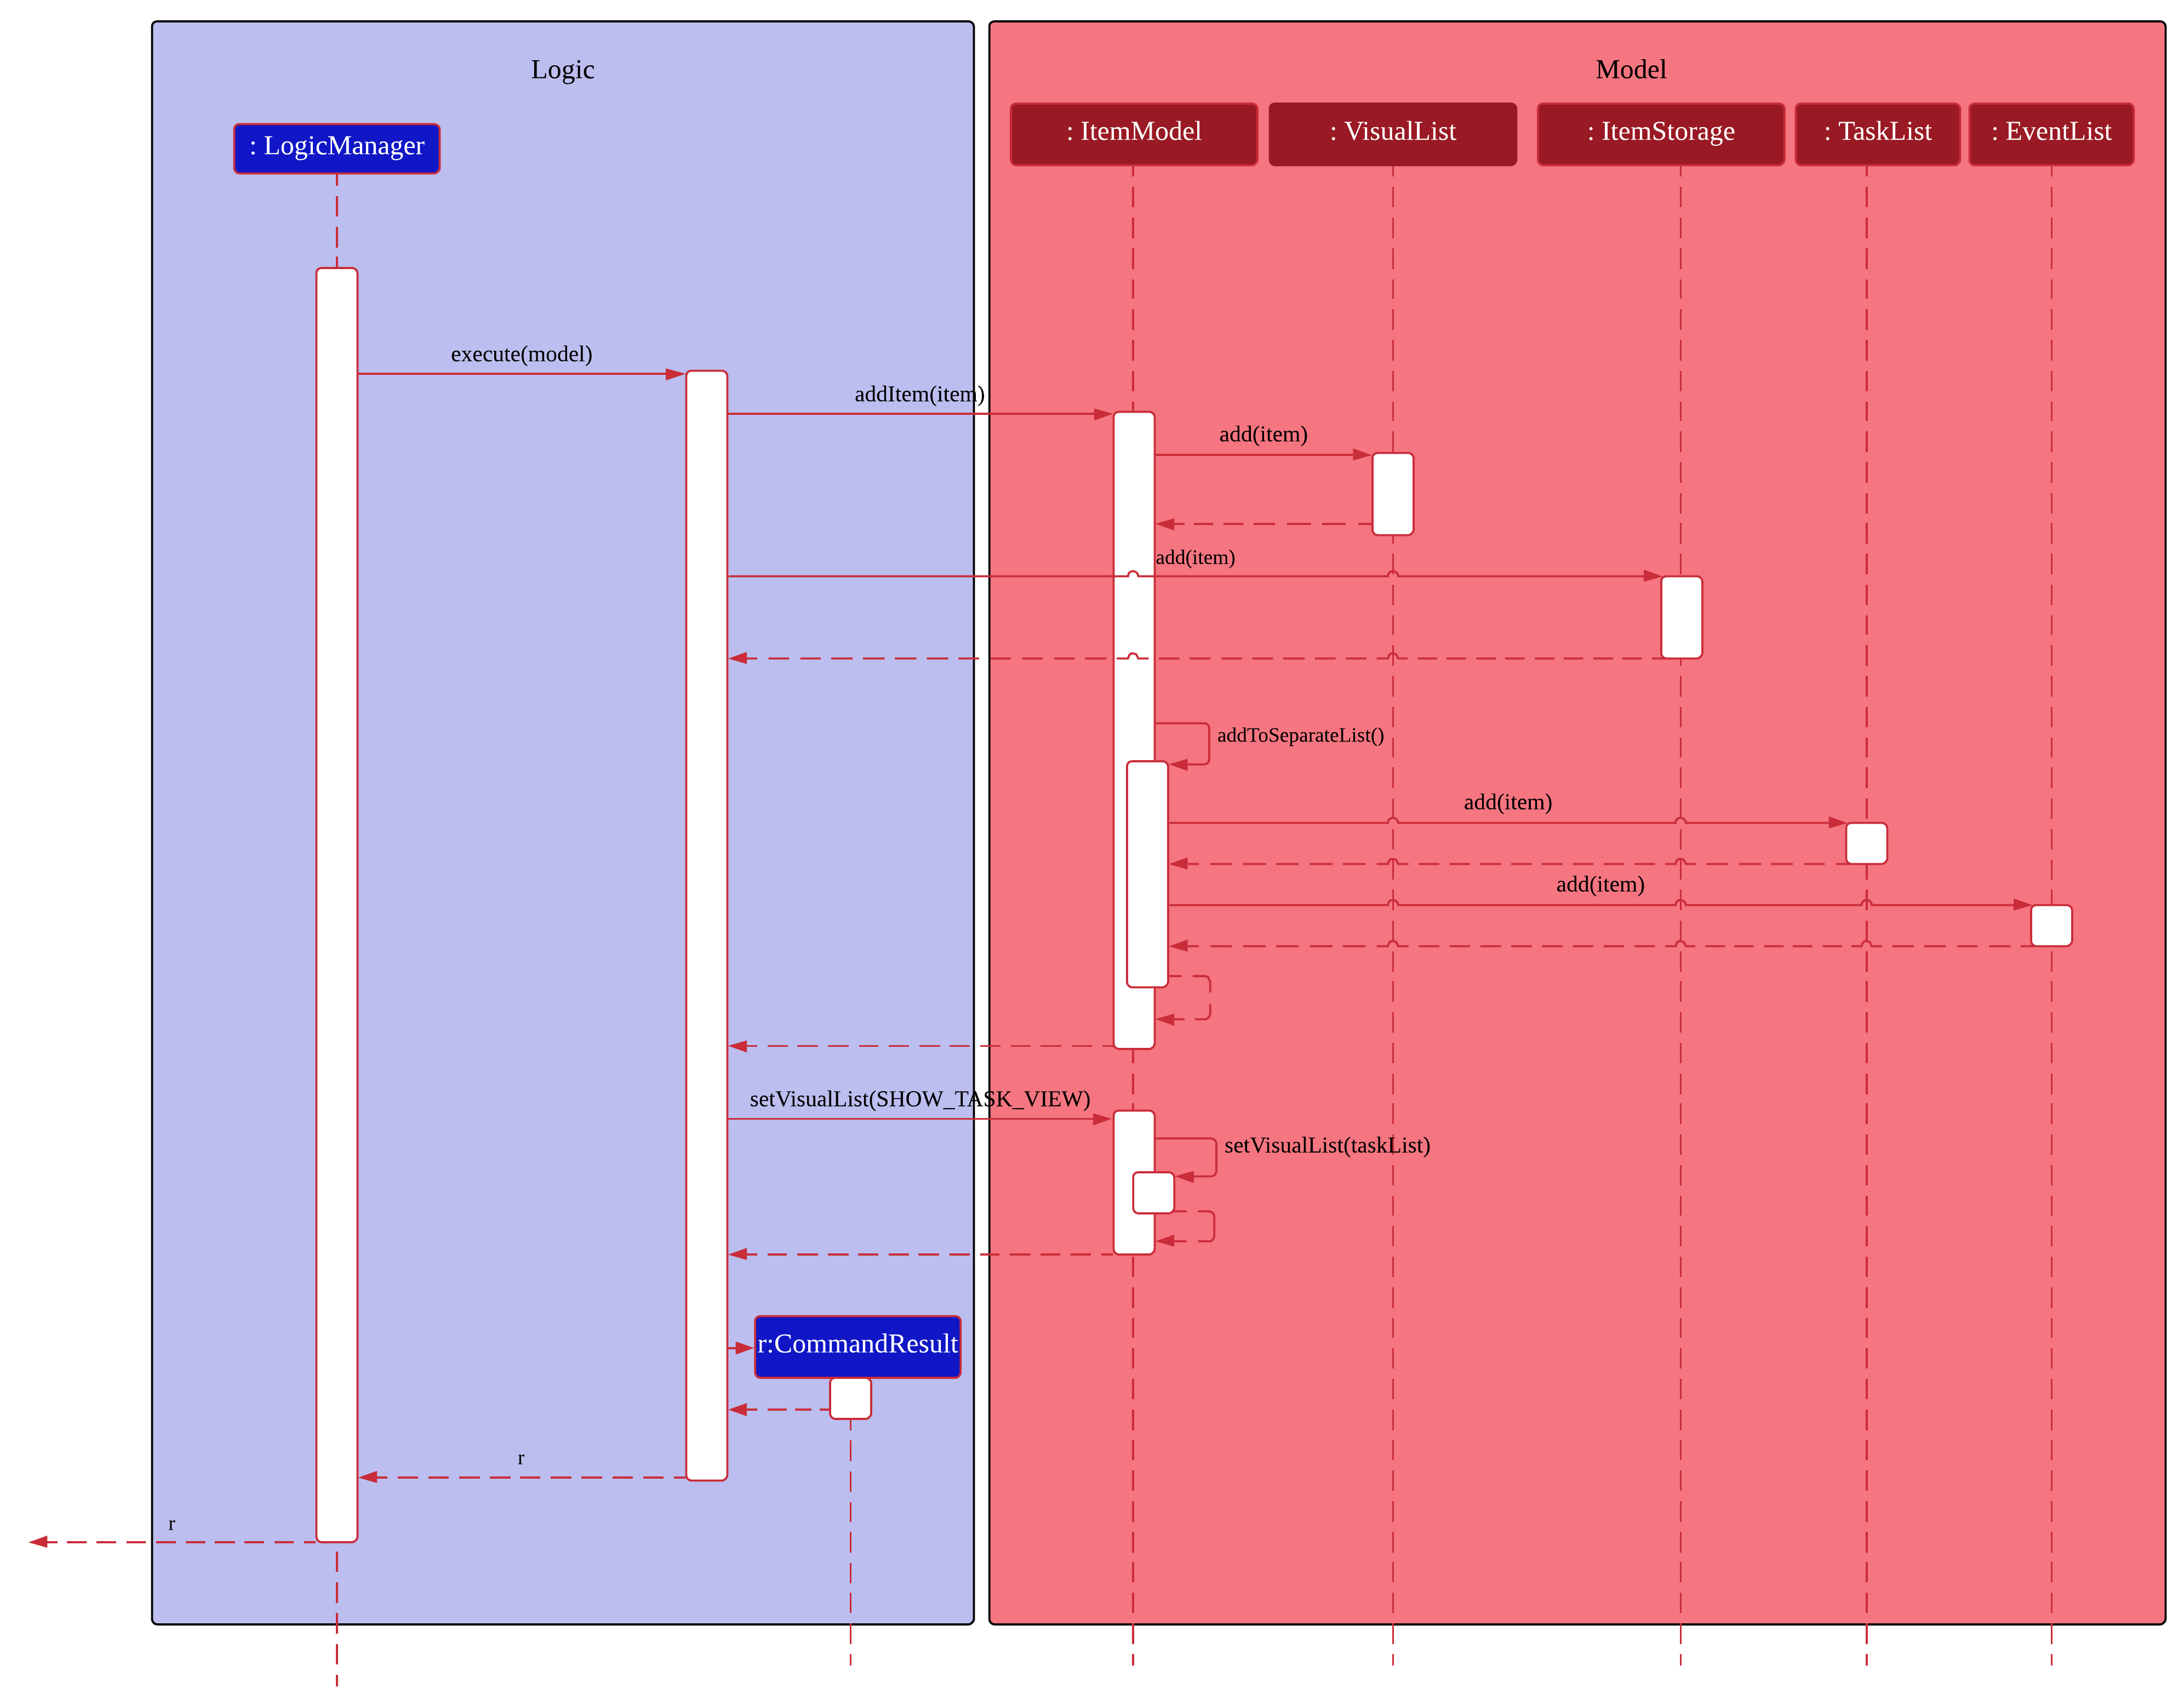
This shows how execute(model) affects the Model component. It then returns a CommandResult r, which is the result of calling LogicManager#execute("task shower -d 1.hour.later").
3.1.3. Design considerations
The design considerations for the classes are shown below:
Alternatives: |
Pros: |
Cons: |
1. Placing all fields into an Item object and retrieving the specific fields when needed. |
Easy to implement. Reduce dependencies between classes as everything is in one class. Editing can be done all in one object. |
Does not separate out the different functionalities of Task, Event and Reminder. |
2. Having separate classes for Task, Event, Reminder |
Reduce dependencies as well as having functionalities separated. |
Some attributes and methods overlap. Repetition of code for same functionality. Have to add all three objects individually. Editing of an item would require searching, obtaining and individually editing all 3 objects. |
3. (Current) Having a general Item class which comprise of |
Similar fields such as description and priority can be placed in Item. This makes adding an Item more convenient. Related task/event/reminder can have access to each other. |
Increase coupling and dependency amongst Task, Event, Reminder classes. |
As of now, these are the considered designs and the current design seems to work well for our purpose. However, there could be better designs which are unexplored that could mitigate our cons and we welcome them.
This is end of the section of adding a Task and Event. As mentioned above, adding of Reminder will be shown in a separate section due it having extra features. Do look out for it if you’re interested.
3.2. Rescheduling of recurring Events automatically
This section talks about how the autoReschedule function is implemented. This feature aims to provide users with greater convenience when scheduling events that occur periodically (eg. weekly deadlines, monthly appointments).
3.2.1. Implementation
To reschedule a task, we need a deadline as we need to be able to calculate the next date. Recall that any Task with a deadline is considered an Event. As such, only Events can be rescheduled.
To automatically reschedule an Event, when creating the Event, include the -auto flag along with its reschedule period (eg -auto day for daily rescheduling)
The accepted parameters for -auto is day, week, month and the format of 10.min.later.
The following diagram shows the process of adding an Event with -auto flag:
Activity diagram of AutoReschedule
|
In the diagram, when we add the Event initially, we would check the start time of the Event and update it accordingly.
However, this is not the only place where rescheduling occurs. 3 places where rescheduling can occur: 1) When the event is created, as shown in the diagram above. |
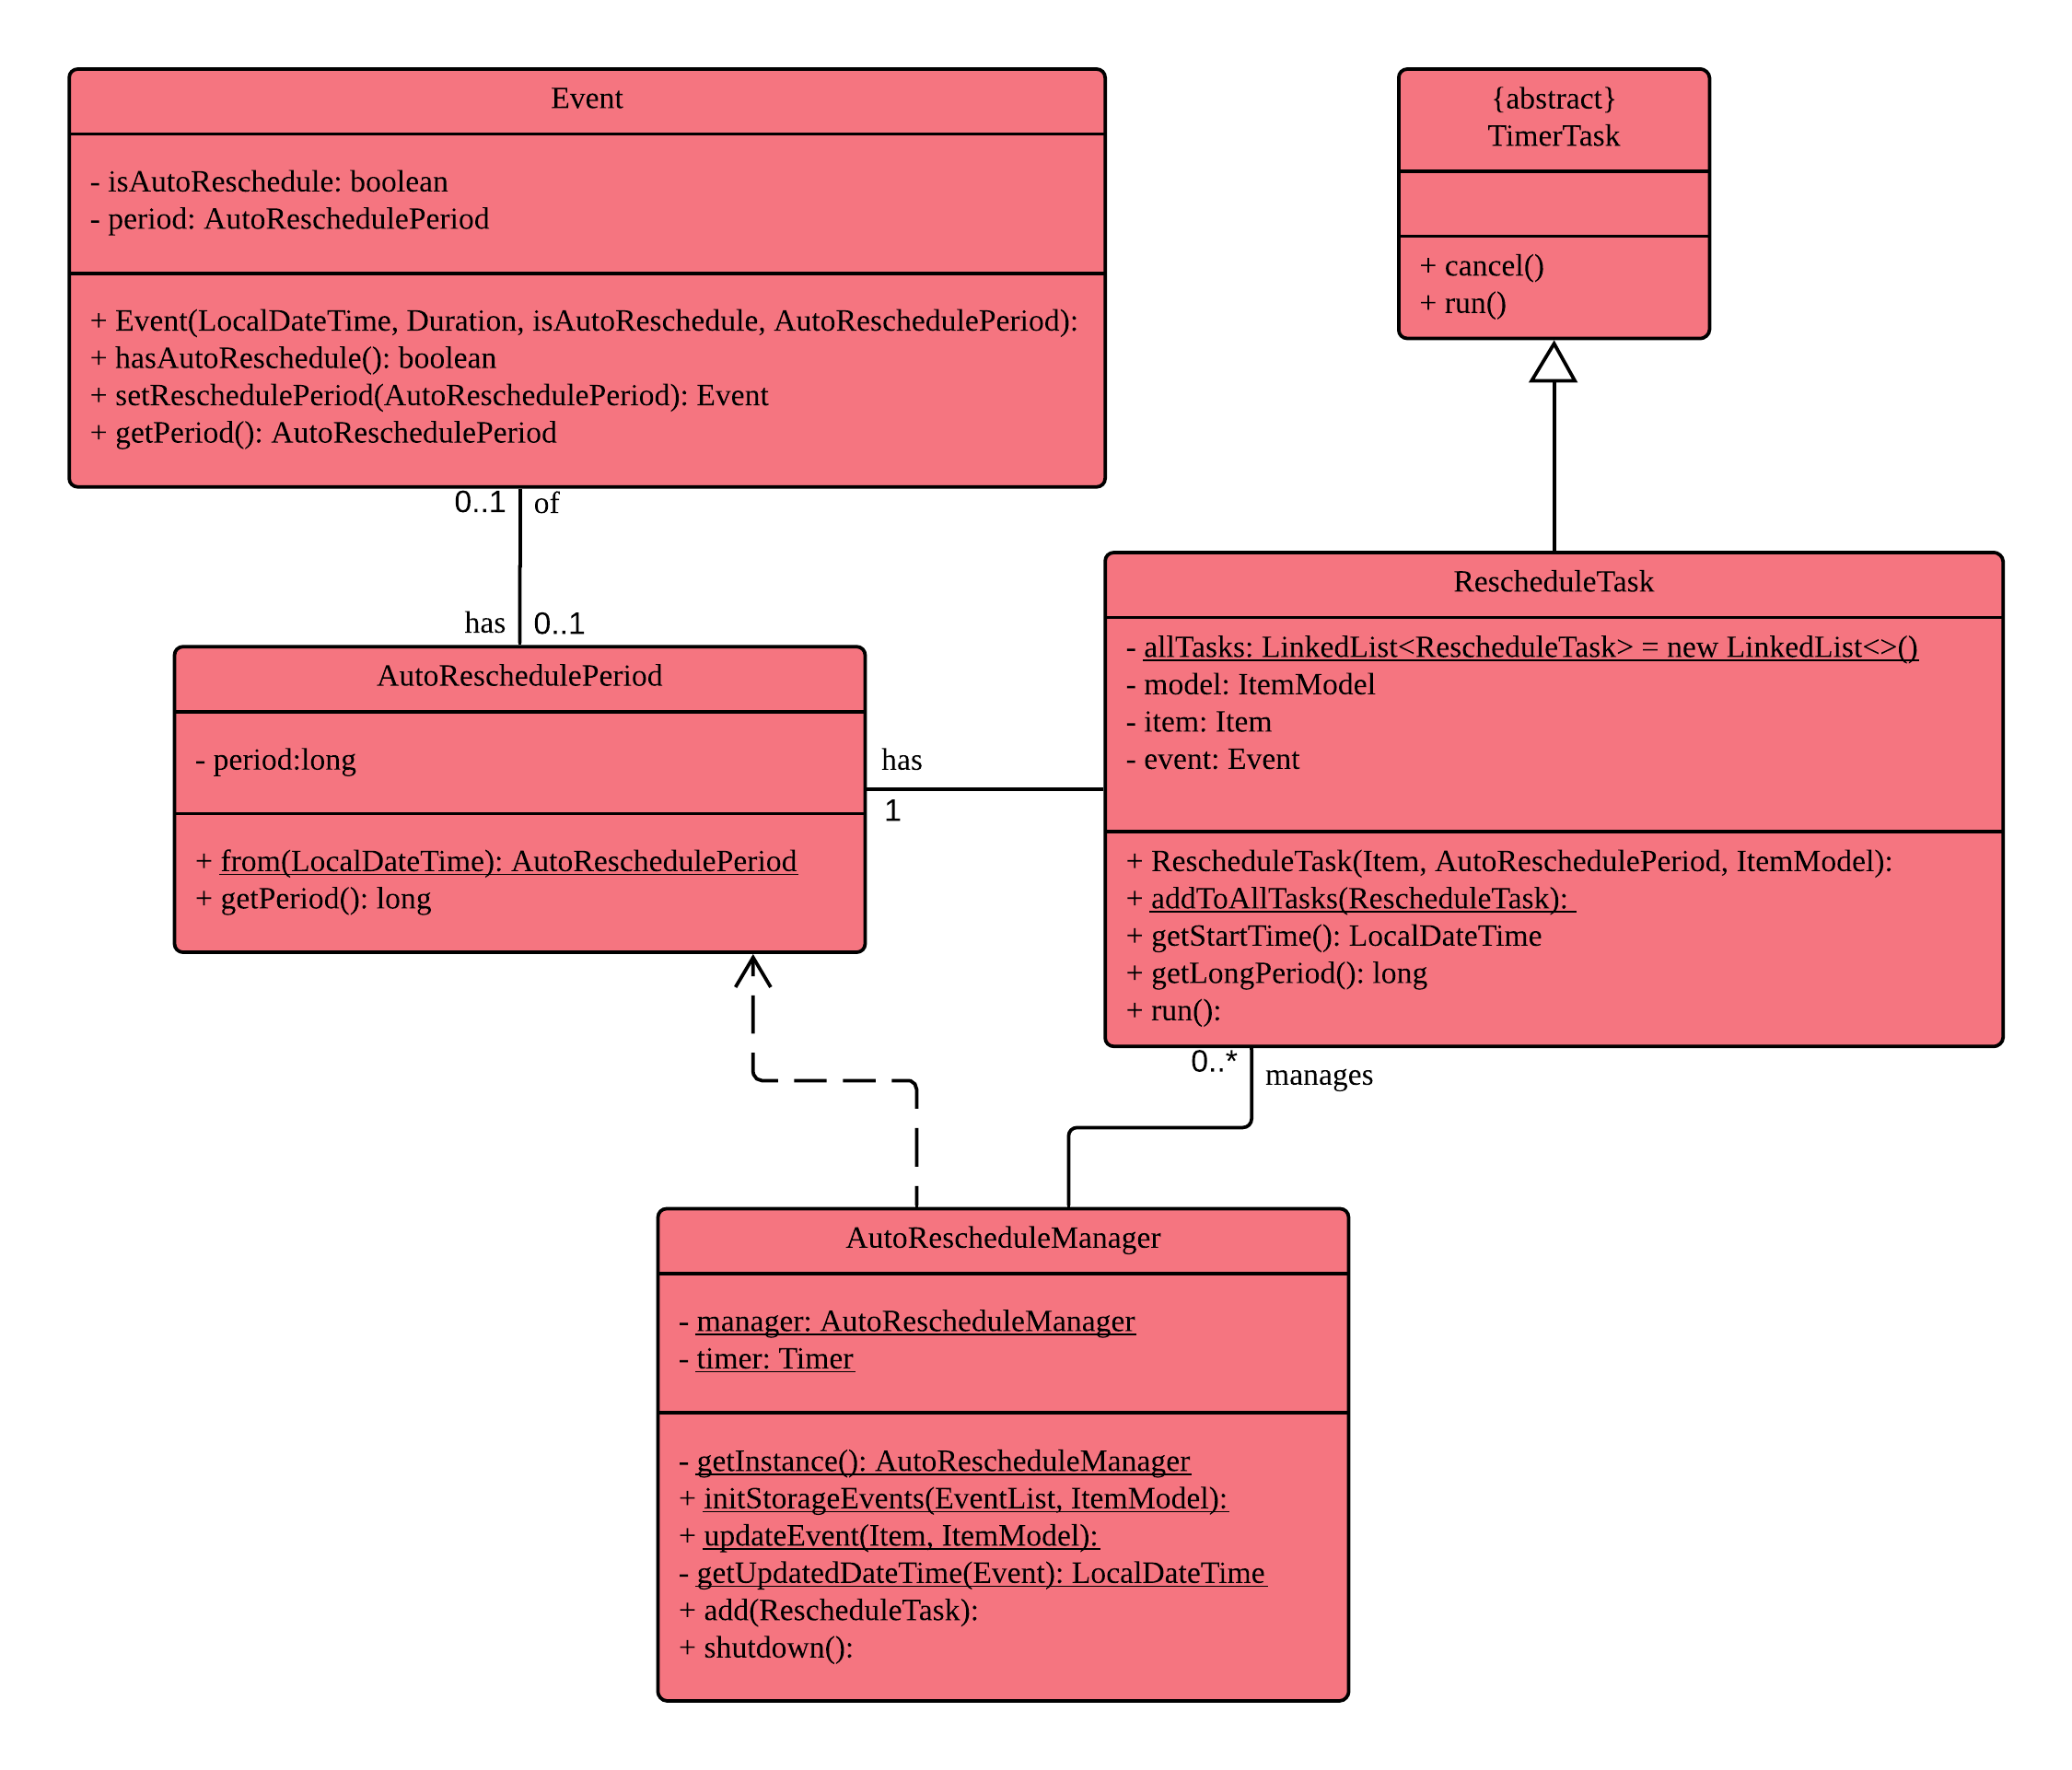
To illustrate how they work, first we need to know what classes are involved before we can understand the sequence of actions carried out.
The classes involved in the above rescheduling are:
-
AutoReschedulePeriod— Represents the period of every reschedule (eg day/week/month) -
RescheduleTask— Represents the action to perform when rescheduling its associated event. -
AutoRescheduleManager— Manages all the rescheduling tasks. There is only one of such manager.
To better understand its underlying structure, we can look at the class diagram below:
3.2.2. Internal workings of the command
Now we are ready to look at the sequence of actions. Given below is an example usage scenario of how add behaves at each step:
Step 1. The user enters the command event CS2103T Quiz -d 23/09/2019 2359 -auto week.
Step 2. The Event is created, following the sequence of steps in the section Adding Task/Event. However there are now some extra steps from Step 3 onwards that occur concurrently from the object creation of Event.
Step 3a. The presence of the -auto week creates an AutoReschedulePeriod, which is stored in the Event created. This can be seen in the Class Diagram above.
Step 3b. If the start time of this Event is already over, the Event’s start time will be modified to show the next start time, using this Event’s AutoReschedulePeriod.
Step 4. When LogicManager#execute(model) is called, the presence of AutoReschedulePeriod in the Event triggers the creation of a RescheduleTask, which represents the task of rescheduling this Event.
Step 5. This RescheduleTask is added to an AutoRescheduleManager, which manages all RescheduleTasks.
Step 6. When the start time of this Event has passed, AutoRescheduleManager will call RescheduleTask#run(), and this updates the Event start time, which will be reflected in the Ui.
The following diagrams show how the command event Quiz -d 10.hour.later -auto week is executed from the Logic component.
The first diagram shows the adding of an Event, which may appear familiar as it has a sequence similar to the adding of task in Section 3.1, “Add Task/Event feature”. However, there are some minor differences due to the presence of -auto which should be noted.
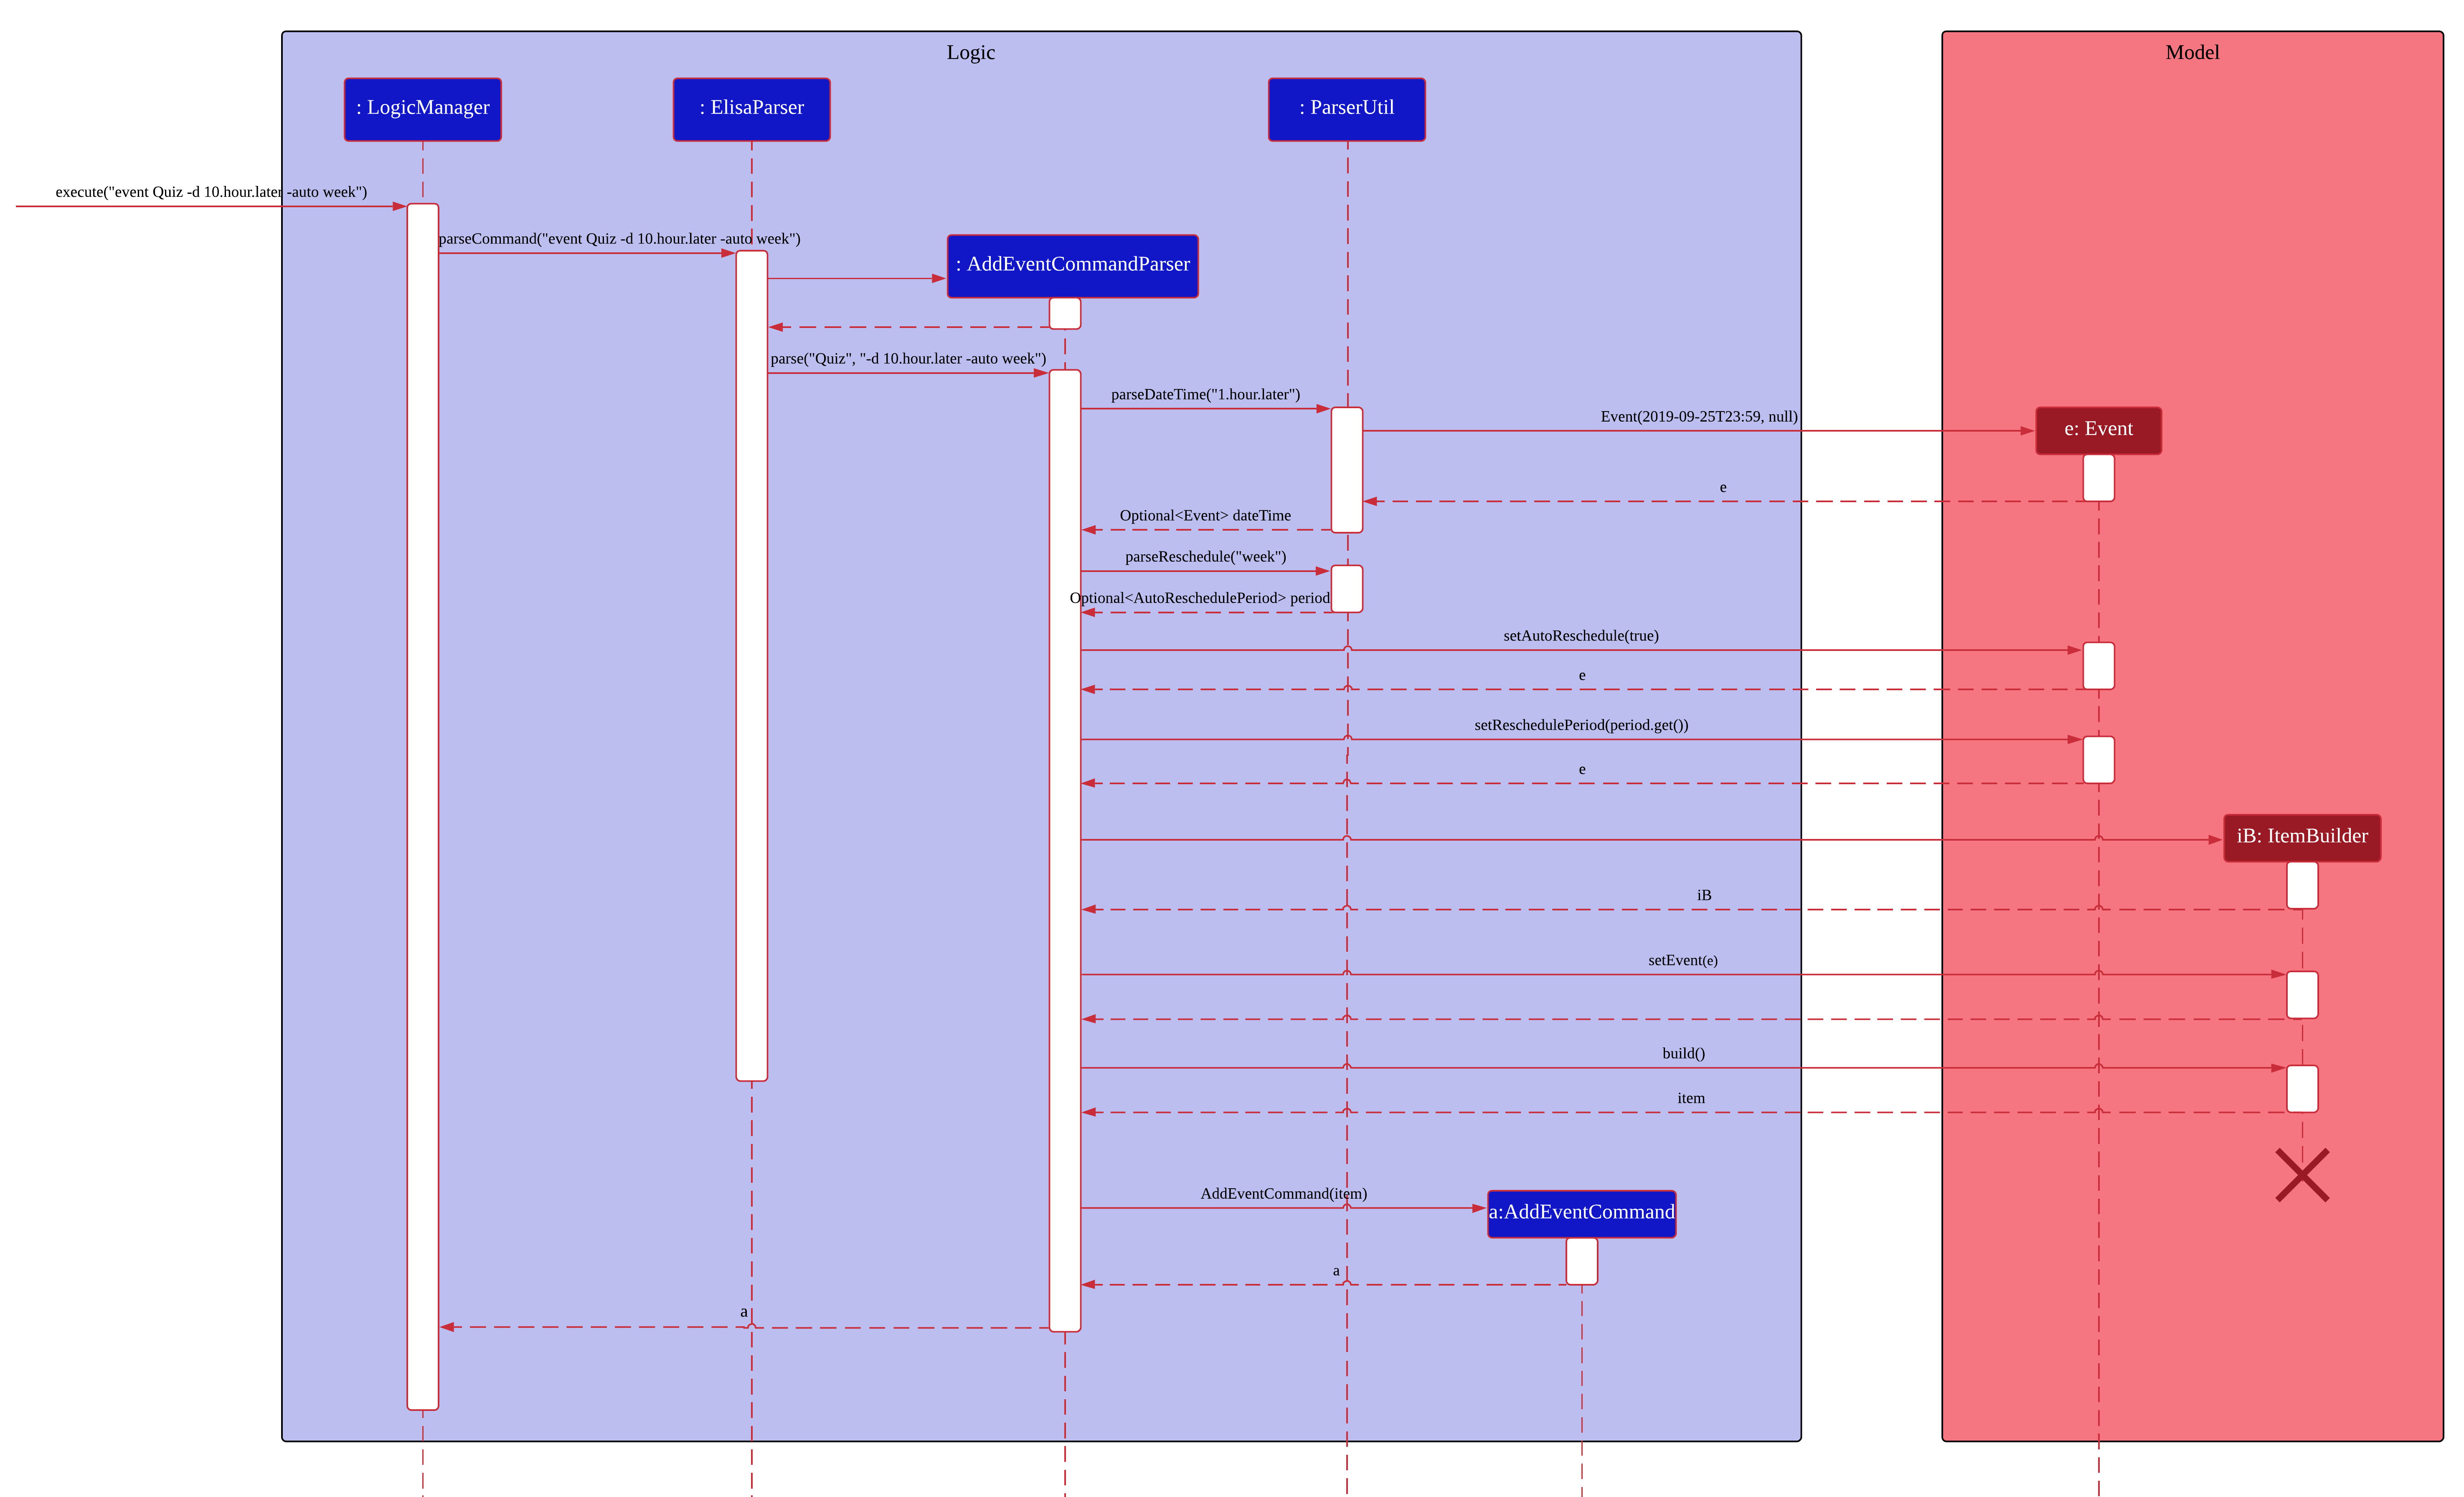
As mentioned, the key points to take note of in the diagram above is Event#setAutoReschedule(true) and Event#setReschedulePeriod(period).
The significance of these methods will be shown in the continuing diagram below:
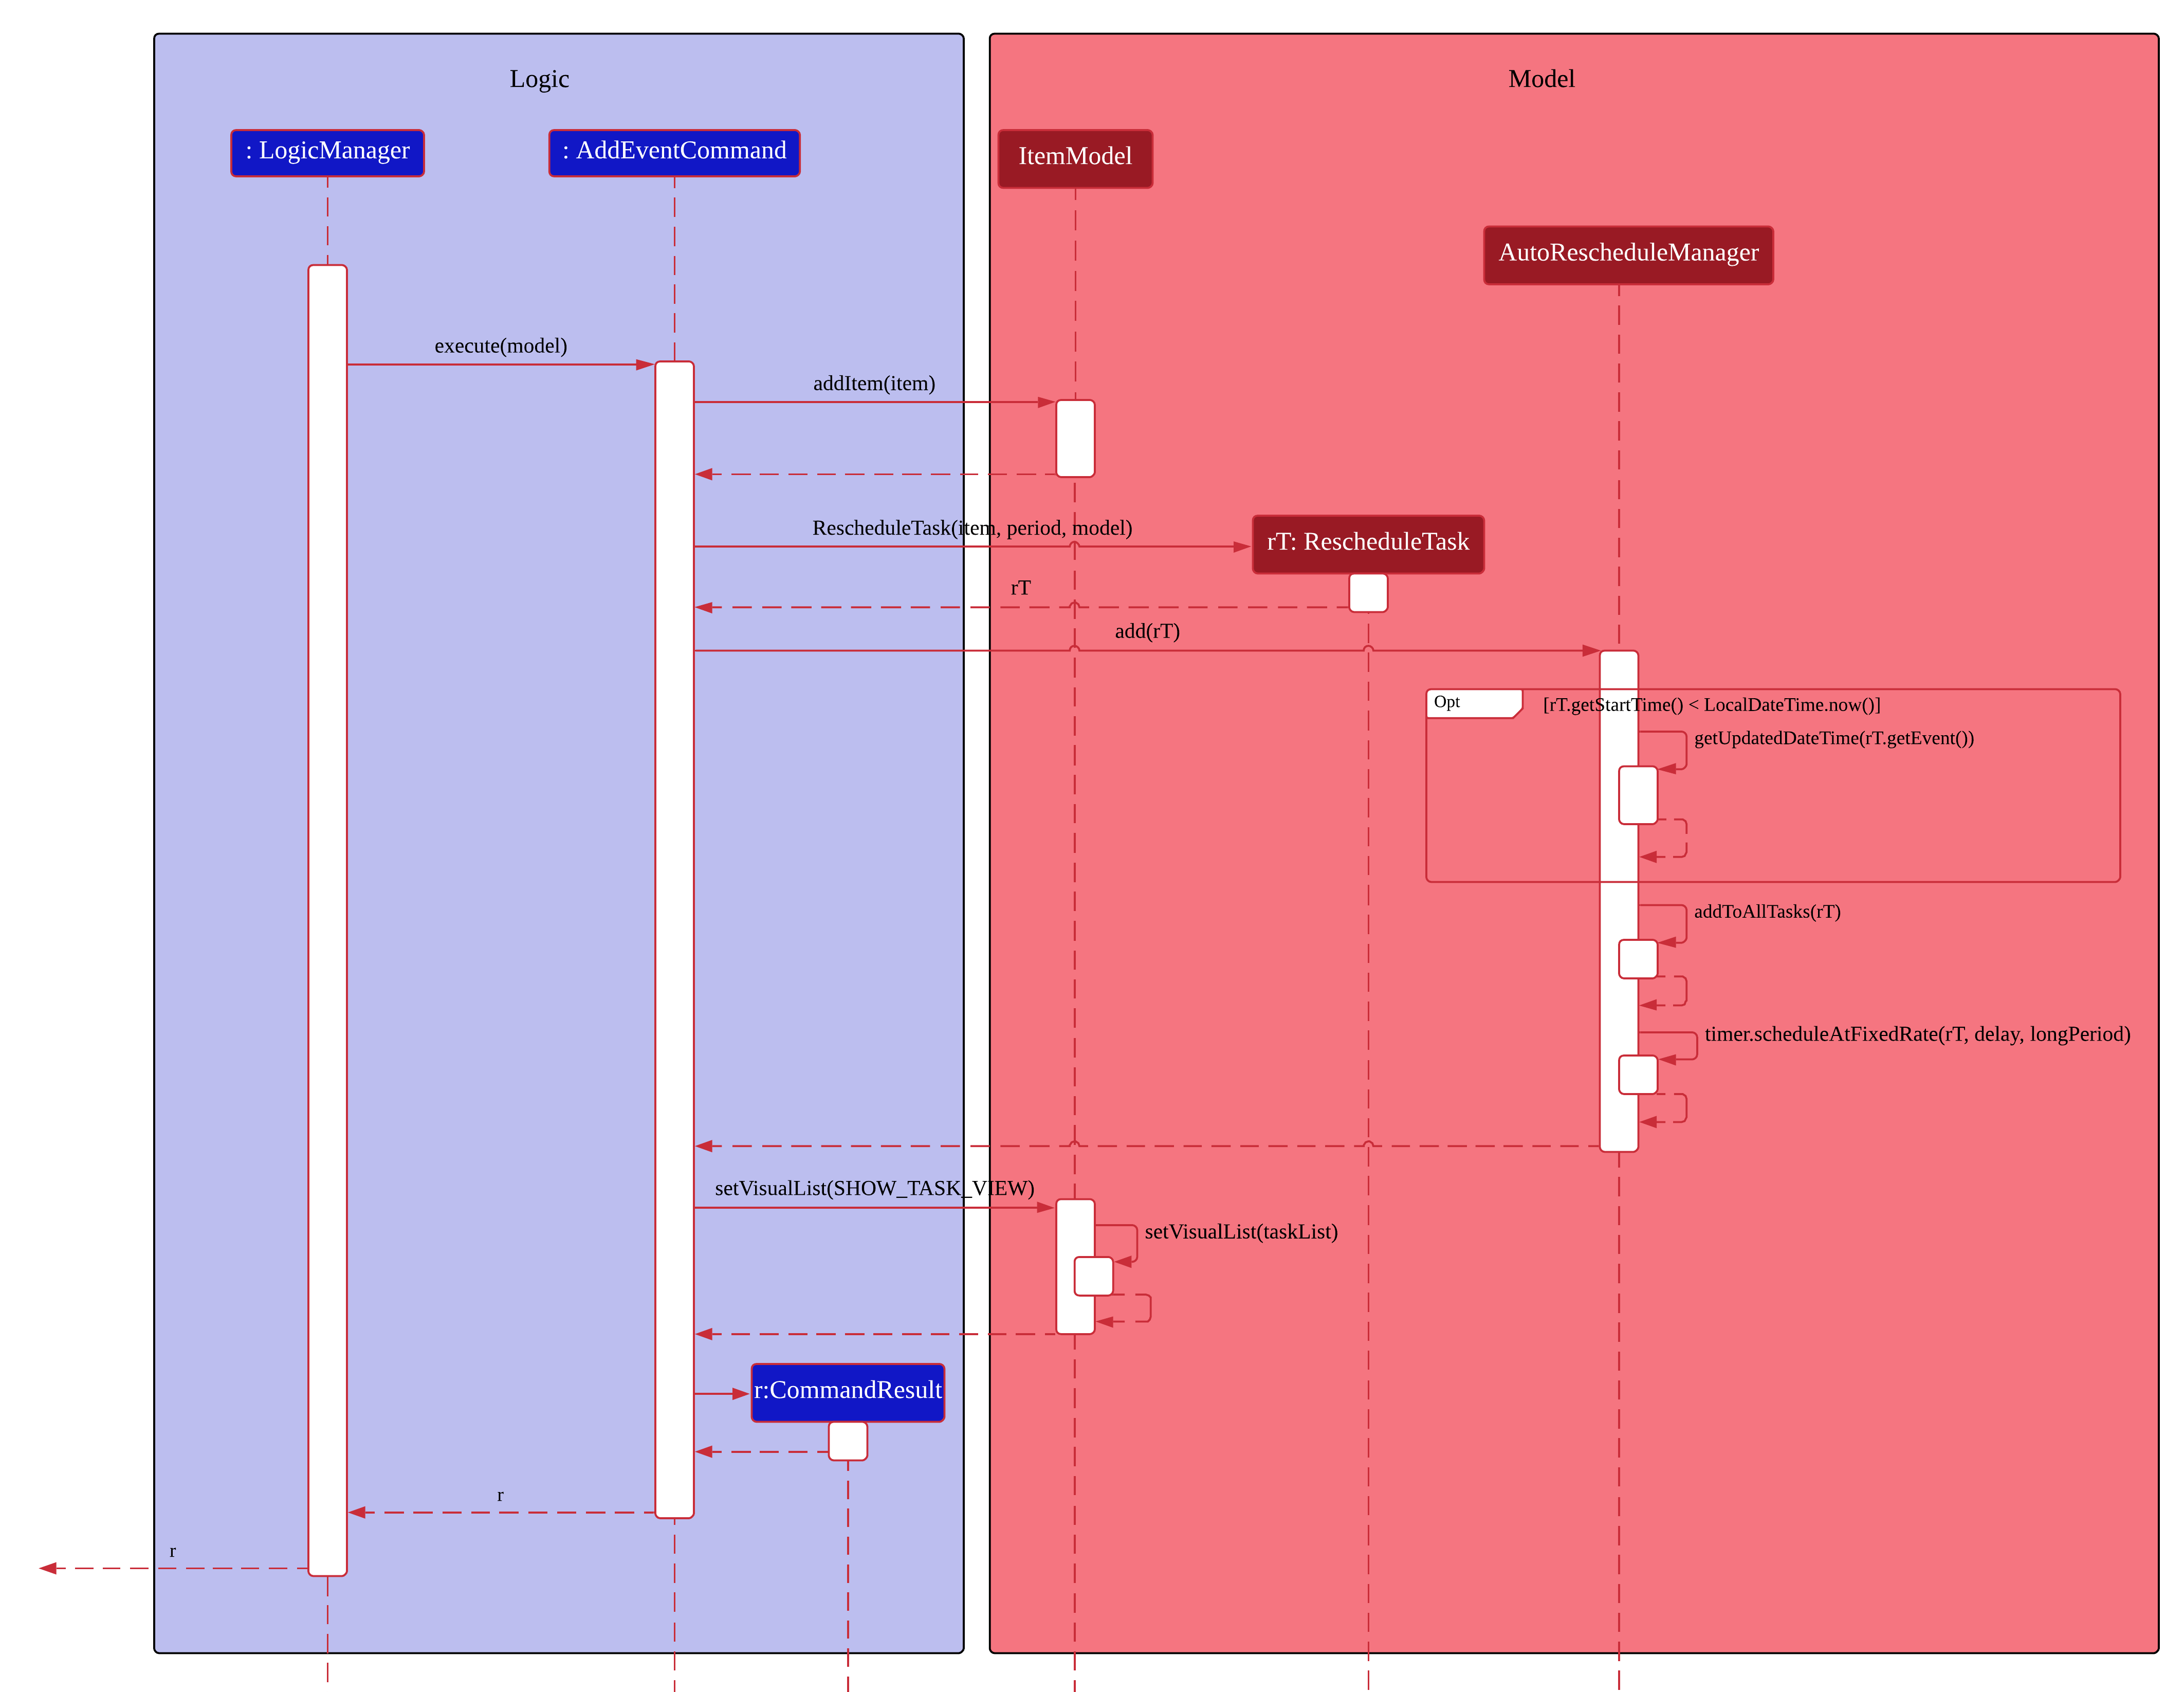
From the above diagram, we can see that the presence of AutoReschedulePeriod in Event results in the creation of RescheduleTask which would be queued into the Timer managed by AutoRescheduleManager.
3.2.3. Design considerations
The design considerations for the classes are shown below:
Alternative 1: Creating a AutoRescheduleManager for every RescheduleTask
Pros: Easy for the Timer in AutoRescheduleManager to keep track of its TimerTask.
Cons: There could potentially be many Timer threads.
Alternative 2: (Current) Singleton pattern for AutoRescheduleManager
Pros: Ensure that only one instance can be instantiated as there should only be one manager for all the RescheduleTask. If there are multiple managers, it would be hard to keep track of all of them and it would be difficult to coordinate all the tasks.
Cons: Difficult to create tests for AutoRescheduleManager. Could have many hidden dependencies, which makes code harder to maintain.
3.3. Game feature
This section talks about how the game function is implemented. This feature aims to encourage users to take a break by playing the traditional Nokia (phone) game: Snake.
3.3.1. Implementation
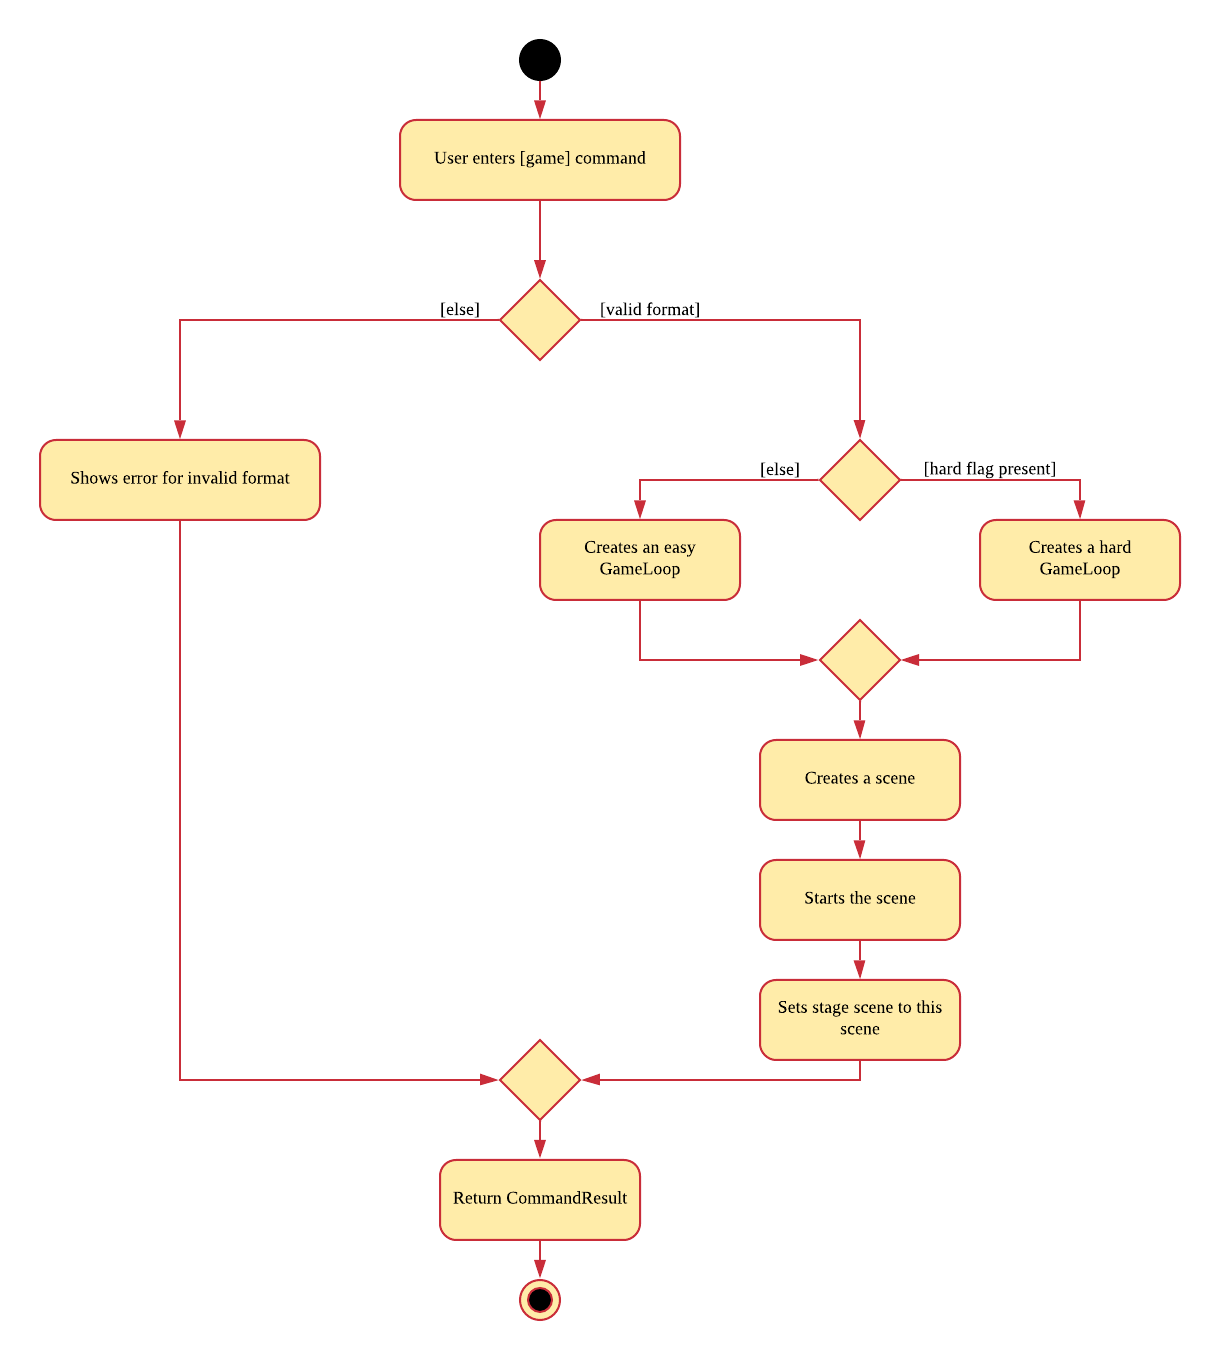
The game screen appears after the user enters the command game into the command box. A separate scene handled by a separate thread is created to run the game so that Elisa’s scenes and threads are not overloaded. The following activity diagram shows how the game screen is launched.
3.3.2. Internal workings of the Game
Given below is an example usage scenario of how add behaves at each step:
<LOGIC>
Step 1. The user enters the command "game".
Step 2. The LogicManager creates an ElisaParser to parse the user input.
Step 3. ElisaParser creates a GameCommandParser to parse the user input.
Step 4. LogicManager will execute the GameCommand. GameCommand will create a GameCommandResult.
Step 5. MainWindow will call its own method startgame().
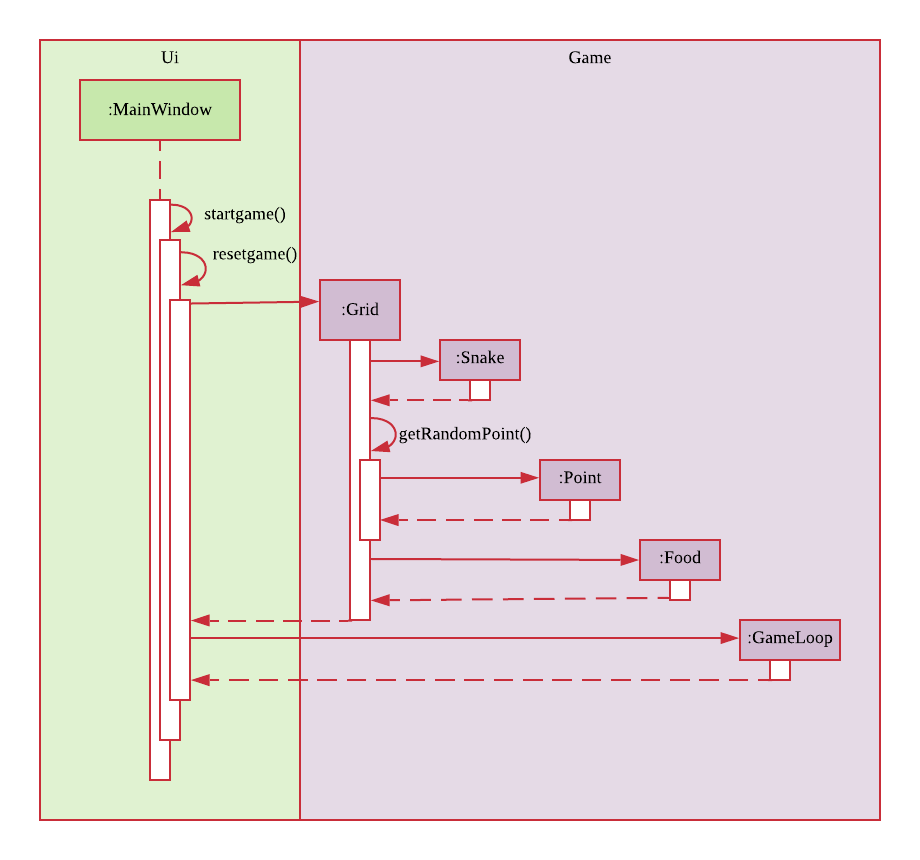
<GAME>
Step 6. startgame() calls the method resetgame(), which creates a Grid and GameLoop.
Step 7. startgame() calls the method gameCheck on the canvas to check the keys that are pressed during the game.
Step 8. startgame() creates a new scene and sets primaryStage’s scene to this new scene.
Step 9. startgame() creates a new thread to run the game.
The figure below shows the sequence diagram on what happens after the startgame() method is called.
3.3.3. Game considerations
The considerations for the choice of game is shown below:
Alternatives: |
Pros: |
Cons: |
1. Minesweeper |
It is a well-known popular desktop game. |
It is difficult to understand the implied rules to this game and this game requires a long time to complete. |
2. Sudoku |
It is a well-known popular pen-and-paper game. |
It is difficult to understand the implied rules to this game and this game requires a long time to complete. |
3. (Current) Snake |
It is a well-known popular Nokia (phone) game. The rules are simple to understand. The duration for each game is short. |
It is addictive when users try to break their high score. |
3.3.4. Design considerations
The design considerations for the placement of the game is shown below:
Alternatives: |
Pros: |
Cons: |
1. Placing the game in one of the tabs (beside the Calendar) such that |
Users are able to see the chatbox while in the game. |
Requires users to use the mouse (away from CLI) to switch between typing in the command box and hitting the keys on the keyboard. |
2. (Current) Creating a separate scene such that the original scene (with ELISA) is hidden when game mode is entered. |
Allows users to hit the keys on the keyboard without typing into the command box. |
Users are unable to see the chatbox from Elisa. |
3.4. [Implemented] Undo/Redo Feature
3.4.1. Current Implementation Logic
The undo function uses the revert command method without using states and history, unlike the proposed method. This is because an issue was encountered with referencing lists and firing reminders multiple times when the state history method was used.
In this implementation, the commands that can be undone; that is, all the commands except UndoCommand, ExitCommand,
UpCommand and DownCommand now extend from an abstract class UndoableCommand, which is a subclass of Command.
Subclasses of UndoableCommand must implement a method reverse(ItemModel model), which should do the exact opposite
of the execute(ItemModel model) in that Command.
The command execution history is stored in a stack, which is maintained in ElisaCommandHistory.
The activity diagram below shows the flow of the undo command.
![][](images/UndoActivity.png)
Below is a possible usage scenario and the app behaviour.
Step 1. The user executes task eat. A task with description "eat" is added and then the command is pushed into the commands stack.
![][](images/UndoStackStep1.png)
Step 2. The user realises that adding the task was a mistake, and decides to undo by entering undo into ELISA. The undo command
will pop the AddTaskCommand from the stack and reverse the effects of that command, in this case by deleting the task "eat" from the TaskList.
![][](images/UndoStackStep2.png)
Step 3. After successful execution of the UndoCommand a confirmation message is displayed in the chat box.
Of course, the undo feature has its counterpart, the redo command. The commands to be redone are stored in an additional stack within ElisaCommandHistory,
and when the redo is done, it executes the command again, which reapplies the most recent change. Every time a new UndoableCommand is executed, the redo stack is cleared.
That is, the redo stack is only non empty when the latest executed Command(s) is/are UndoCommand(s).
The activity diagram below shows the flow of the redo command.
![][](images/RedoActivity.png)
3.5. [Previous] Undo/Redo feature
3.5.1. Previous Implementation [Has since been refactored]
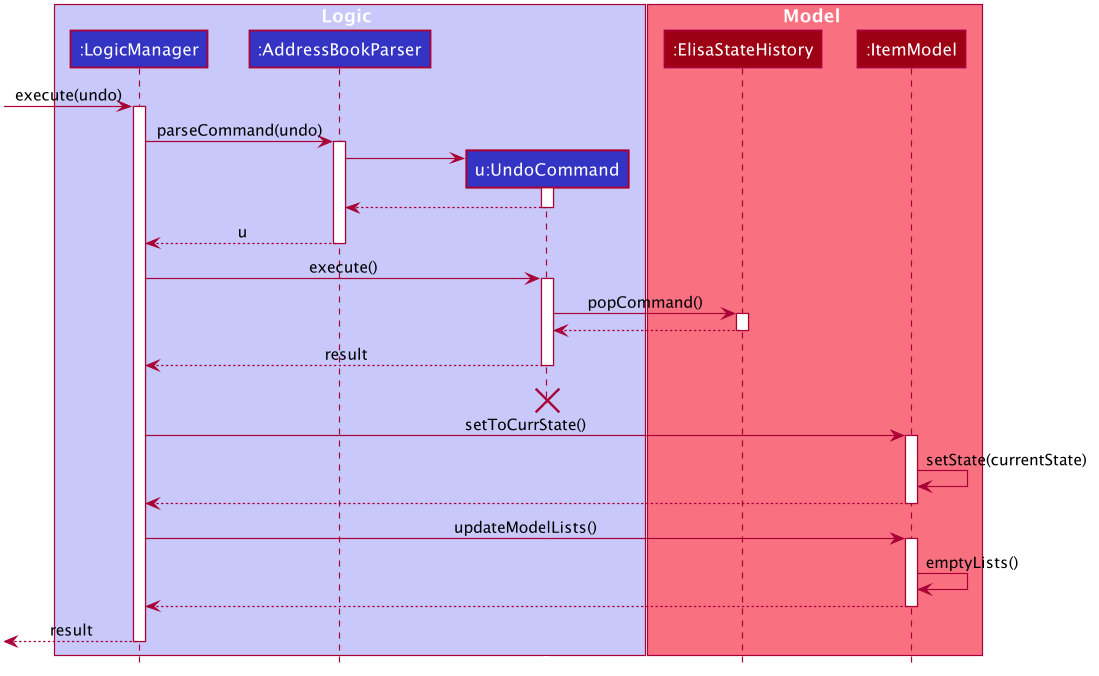
The undo/redo mechanism is facilitated by ElisaStateHistory.
It stores a stack of type ElisaState, which keeps track of the app data with a deep copy of the ItemStorage and the current displayed list with a deep copy of VisualizeList.
Additionally, it implements the following operations:
-
ElisaStateHistory#push()— Saves the current ELISA state in its history. -
ElisaStateHistory#pop()— Removes and returns the latest state as long as there is more than 1 item in the stack. This 1 item is the original application state that is saved on startup. -
ElisaStateHistory#size()— Returns the number of states in the stack.
Given below is an example usage scenario and how the undo mechanism behaves at each step.
Step 1. The user launches the application for the first time. The ElisaStateHistory will be initialized with the initial ELISA state
![][](images/UndoState0.png)
Step 2. The user executes task eat command to add a task with a description "eat". Upon execution of any command except undo and show, the Logic calls ItemModel#updateState() to save the latest state to ElisaStateHistory.
![][](images/UndoState1.png)
Step 3. The user executes task jogging to add another task with description "jogging". This command also calls ItemModel#updateState(), causing another modified ELISA state to be saved into the ElisaStateHistory.
![][](images/UndoState2.png)
If a command fails its execution, it will not call ItemModel#updateState(), so the ELISA state will not be saved.
|
Step 4. The user now decides that adding the task "jogging" was a mistake, and decides to undo that action by executing the undo command. The undo command will call ElisaStateHistory#popCommand(), which will delete the last added state, and Logic will update the application state to the one at the top of the stack after command execution.
![][](images/UndoState3.png)
If the size of ElisaStateHistory is 1, that is, only containing the initial state, then there are no previous Elisa states to restore. The undo command checks for this case within its execute() method. If so, it will return an error to the user rather than attempting to perform the undo.
|
The following sequence diagram shows how the undo operation works:
3.5.2. Design Considerations
Aspect: How undo & redo executes
-
Alternative 1 (initial choice): Saves the entire Elisa state.
-
Pros: Easy to implement.
-
Cons: May have performance issues in terms of memory usage, especially when a large number of items are added.
-
Another Con found after implementation: Reminders fire multiple times due to storing multiple references to items
-
-
Alternative 2 (current choice): Individual command knows how to undo/redo by itself.
-
Pros: Will use less memory (e.g. for
delete, just save the item being deleted). -
Cons: We must ensure that the implementation of each individual command are correct.
-
3.6. Priority Mode
3.6.1. Implementation
The priority mode is used to aid the user in focusing on the most pressing task that they have especially when they have many tasks in their list. As priority mode is only for clearing of tasks, the priority mode can only be activated at the task pane of the application.
The priority mode is mainly controlled in the ItemModelManagerItemModelManager
-
ItemModelManager#togglePriorityMode() -
ItemModelManager#toggleOnPriorityMode() -
ItemModelManager#toggleOffPriorityMode()
There are two variants to the priority mode, a normal priority mode and a focus mode. The focus mode is more restrictive than the normal priority mode, preventing the user from doing any operations that are not relevant to the task list, such as adding a new event. This is currently implemented by having a separate Parser when ELISA is in focus mode. (Refer to Section 3.6.4, “Design Consideration” for more details)
There are two ways to trigger priority mode, a normal priority mode that is controlled fully by the user and a scheduled priority mode that is triggered by the user but is scheduled to turn off after a specific amount of time. In addition to the above three methods, the scheduled priority mode also uses the following method:
-
ItemModelManager#startTimer(LocalDateTime)
3.6.2. Example run of priority mode
In this section, we will show a run of the priority mode and a overview of the mechanism at each step. In particular, we will be showing how the ScheduledPriorityCommandPriorityCommand
-
The user opens his Task panel and types in
priority 30.min.later. -
The incomplete tasks are added to a
PriorityQueue -
Once all the items are added into the
PriorityQueue -
The user can type
done 1PriorityQueue
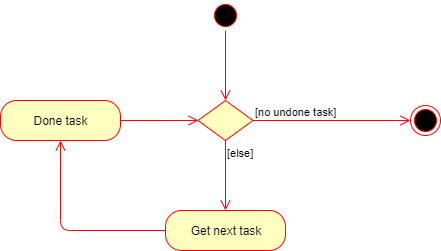
-
ELISA will automatically disable the priority mode after 30 minutes and show all the task that the user have in his task list currently.
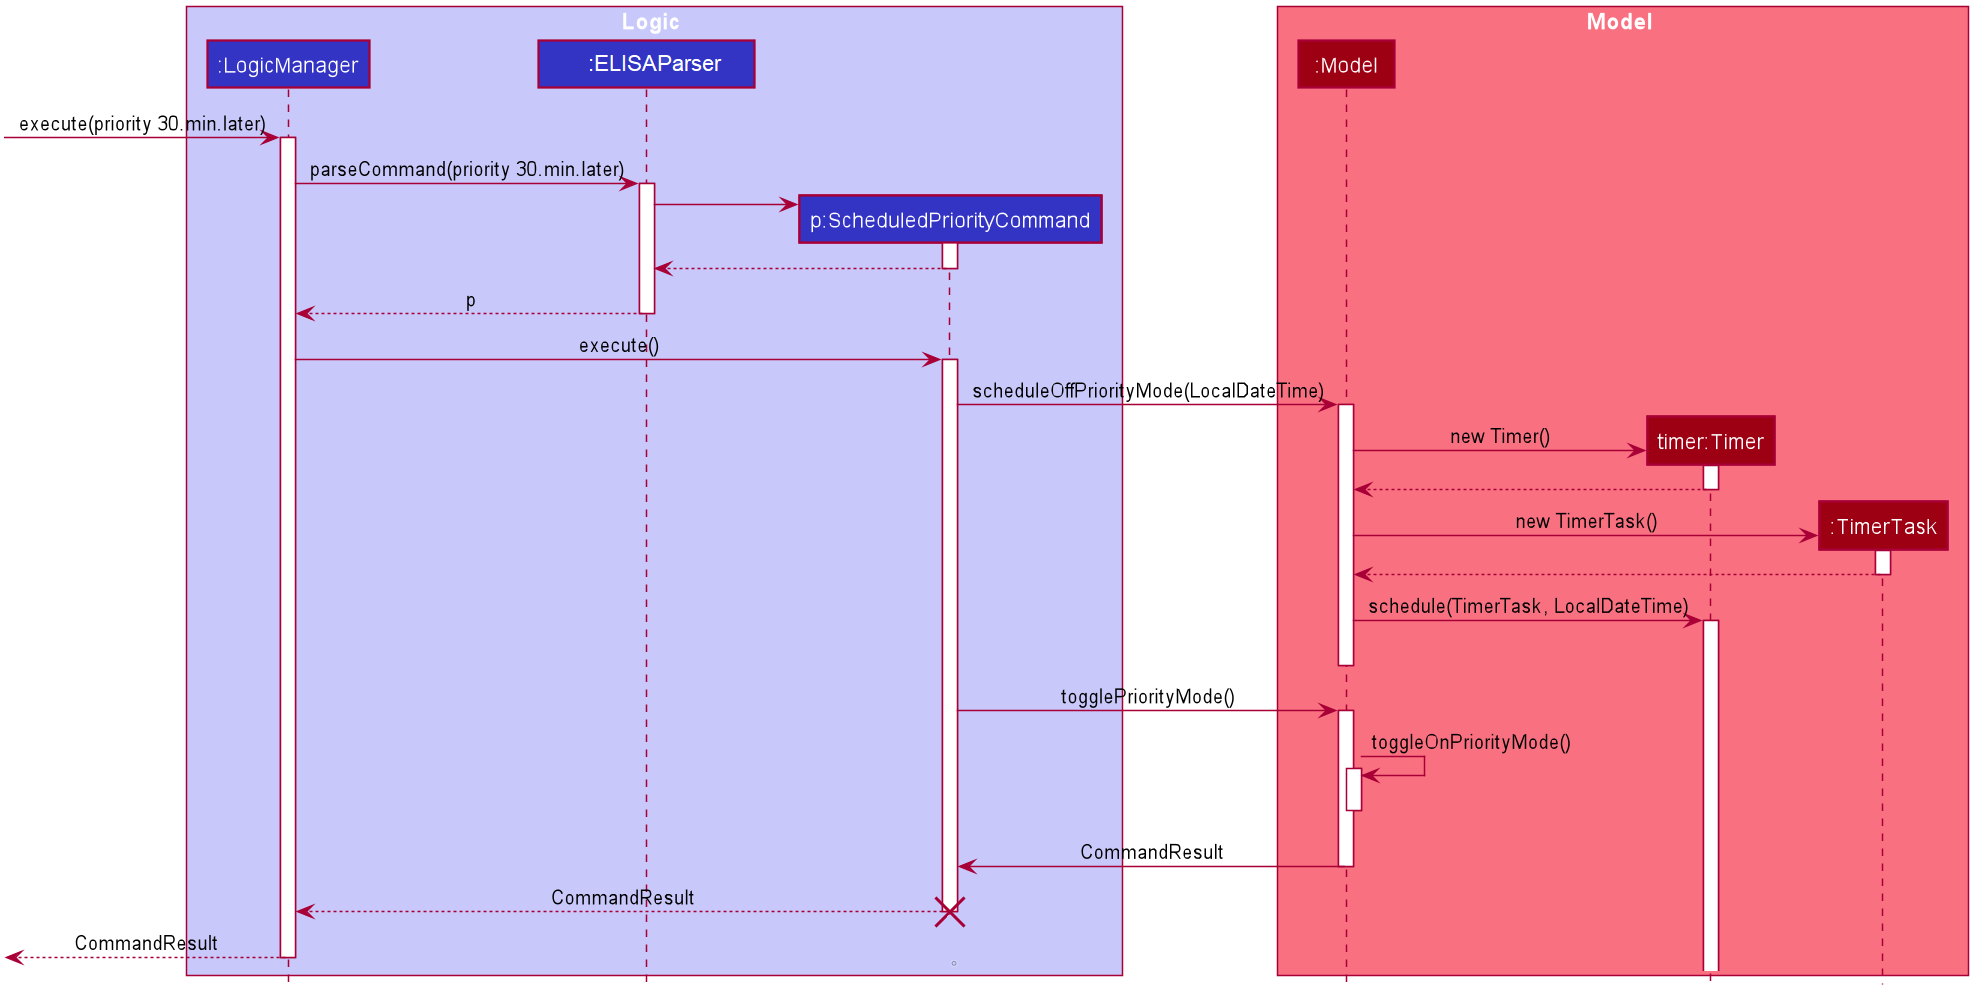
3.6.3. Internal working of the command
The figure below shows the sequence diagram on what happens from a simple execution of the priority 30.min.laterScheduledPriorityCommand
-
When the user types in the command, the
LogicManagerELISAParser -
The
ELISAParserPriorityCommandScheduledPriorityCommandScheduledPriorityCommandLogicManager
The following steps (except step 4) are also applicable to |
-
Within the
LogicManagerScheduledPriorityCommand#execute() -
The
ScheduledPriorityCommandItemModel#scheduleOffPriorityMethod()TimerTimerTaskTimerTask -
The
SchedulePriorityCommandItemModel#togglePriorityMode()ItemModel#toggleOnPriorityMode() -
This creates a new
TaskListTaskList -
A
CommandResultScheduledPriorityCommandLogicManagerUi
A normal priority again.
|
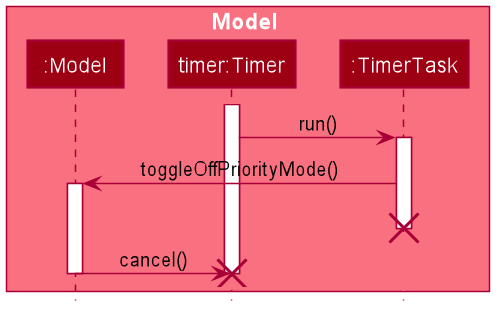
-
As the
TimerItemModelManagerTimerTask#run() -
The
TimerTaskItemModelManager#toggleOffPriorityMode()TimerTimer -
All the items are added back into the
TaskList
3.6.4. Design Consideration
Aspect: How to restrict commands for focus mode
-
Alternative 1: Storing a boolean within the
ItemModelManagerto check if the application is in focus mode or normal mode. Commands that are not allowed to be called in focus mode will check against this boolean to determine if the command is allowed.
| Pros | Cons |
|---|---|
This implementation will contain the changes within the class of the |
This implementation is not scalable as each new |
-
Alternative 2 (Current implementation): Create a new
FocusElisaParserElisaParser
| Pros | Cons |
|---|---|
This implementation stops the creation of the |
There might be difficulty in maintaining the |
Both methods are not scalable in the long run, but at this moment, alternative 2 is favoured as it prevents the command from even being parsed or created, which saves the computing time. At the same time, it is easier to maintain as one only needs to edit the Parser#parse()
Aspect: How to turn off the priority mode after a fixed time
-
Alternative 1: Storing the timer within the
ScheduledPriorityCommand
| Pros | Cons |
|---|---|
Adheres to the SLAP principle with each class having it’s own implementation of the |
There is no way to end the schedule priority mode prematurely as the timer is kept within the command and so cannot be referenced after the execution of the command. |
-
Alternative 2 (Current implementation): Storing the timer within the
ItemModelManager
| Pros | Cons |
|---|---|
The timer can be referenced from the |
This implementation will clutter the |
Alternative 2 was chosen as we believe that the ability to cancel a scheduled priority mode prematurely is more important than the maintainability of the code at the moment.
3.6.5. Possible extension
At the moment, the user is not able to keep track of the amount of time that he has before the schedule priority mode is over. This can be improved by including a countdown timer in the Ui when the user toggles on the scheduled priority mode.
3.7. Add Task/Event feature
Task, Events and Reminders are all Items and can be added using the same command. Adding of Items is facilitated by ItemModel#add(Item).
3.7.1. Implementation
A Task with a deadline flag -d will be considered an Event. A Task with a reminder flag -r will be considered a Reminder.
The following activity diagram shows the how a task can be added, depending on the flags present:
This shows how we can easily add Task, Event and Reminder with a single command. However, in this section, we will only show how Task and Event is added. Adding of Reminders is shown in a separate section as it includes other steps.
3.7.2. Internal workings of the command
Given below is an example usage scenario of how add behaves at each step:
Step 1. The user enters the command "task shower -d 1.hour.later".
Step 2. The LogicManager creates an ELISAParser to parse the user input.
Step 3. ELISAParser creates a AddTaskCommandParser which parses the input and returns an AddCommand.
Step 4. LogicManager will execute the AddCommand. AddCommand will then invoke ItemModel#add(Item), which adds Task to its TaskList and Event to its EventList.
Step 5. AddCommand will also trigger a change in view by calling ItemModel#setVisualList(taskList)
Step 6. Upon the successful execution of AddCommand, a CommandResult is returned to the LogicManager, which will then be returned to the Ui to render the appropriate view.
The figures below shows the sequence diagram on what happens from a simple execution of task shower -d 1.min.later user command:
This diagram shows how execute is carried out in the Logic component.
The following diagram shows how the same command is continued onto the Model component:
This shows how execute(model) affects the Model component. It then returns a CommandResult r, which is the result of calling LogicManager#execute("task shower -d 1.hour.later").
3.7.3. Design considerations
The design considerations for the classes are shown below:
Alternatives: |
Pros: |
Cons: |
1. Placing all fields into an Item object and retrieving the specific fields when needed. |
Easy to implement. Reduce dependencies between classes as everything is in one class. Editing can be done all in one object. |
Does not separate out the different functionalities of Task, Event and Reminder. |
2. Having separate classes for Task, Event, Reminder |
Reduce dependencies as well as having functionalities separated. |
Some attributes and methods overlap. Repetition of code for same functionality. Have to add all three objects individually. Editing of an item would require searching, obtaining and individually editing all 3 objects. |
3. (Current) Having a general Item class which comprise of |
Similar fields such as description and priority can be placed in Item. This makes adding an Item more convenient. Related task/event/reminder can have access to each other. |
Increase coupling and dependency amongst Task, Event, Reminder classes. |
As of now, these are the considered designs and the current design seems to work well for our purpose. However, there could be better designs which are unexplored that could mitigate our cons and we welcome them.
This is end of the section of adding a Task and Event. As mentioned above, adding of Reminder will be shown in a separate section due it having extra features. Do look out for it if you’re interested.
3.8. Rescheduling of recurring Events automatically
This section talks about how the autoReschedule function is implemented. This feature aims to provide users with greater convenience when scheduling events that occur periodically (eg. weekly deadlines, monthly appointments).
3.8.1. Implementation
To reschedule a task, we need a deadline as we need to be able to calculate the next date. Recall that any Task with a deadline is considered an Event. As such, only Events can be rescheduled.
To automatically reschedule an Event, when creating the Event, include the -auto flag along with its reschedule period (eg -auto day for daily rescheduling)
The accepted parameters for -auto is day, week, month and the format of 10.min.later.
The following diagram shows the process of adding an Event with -auto flag:
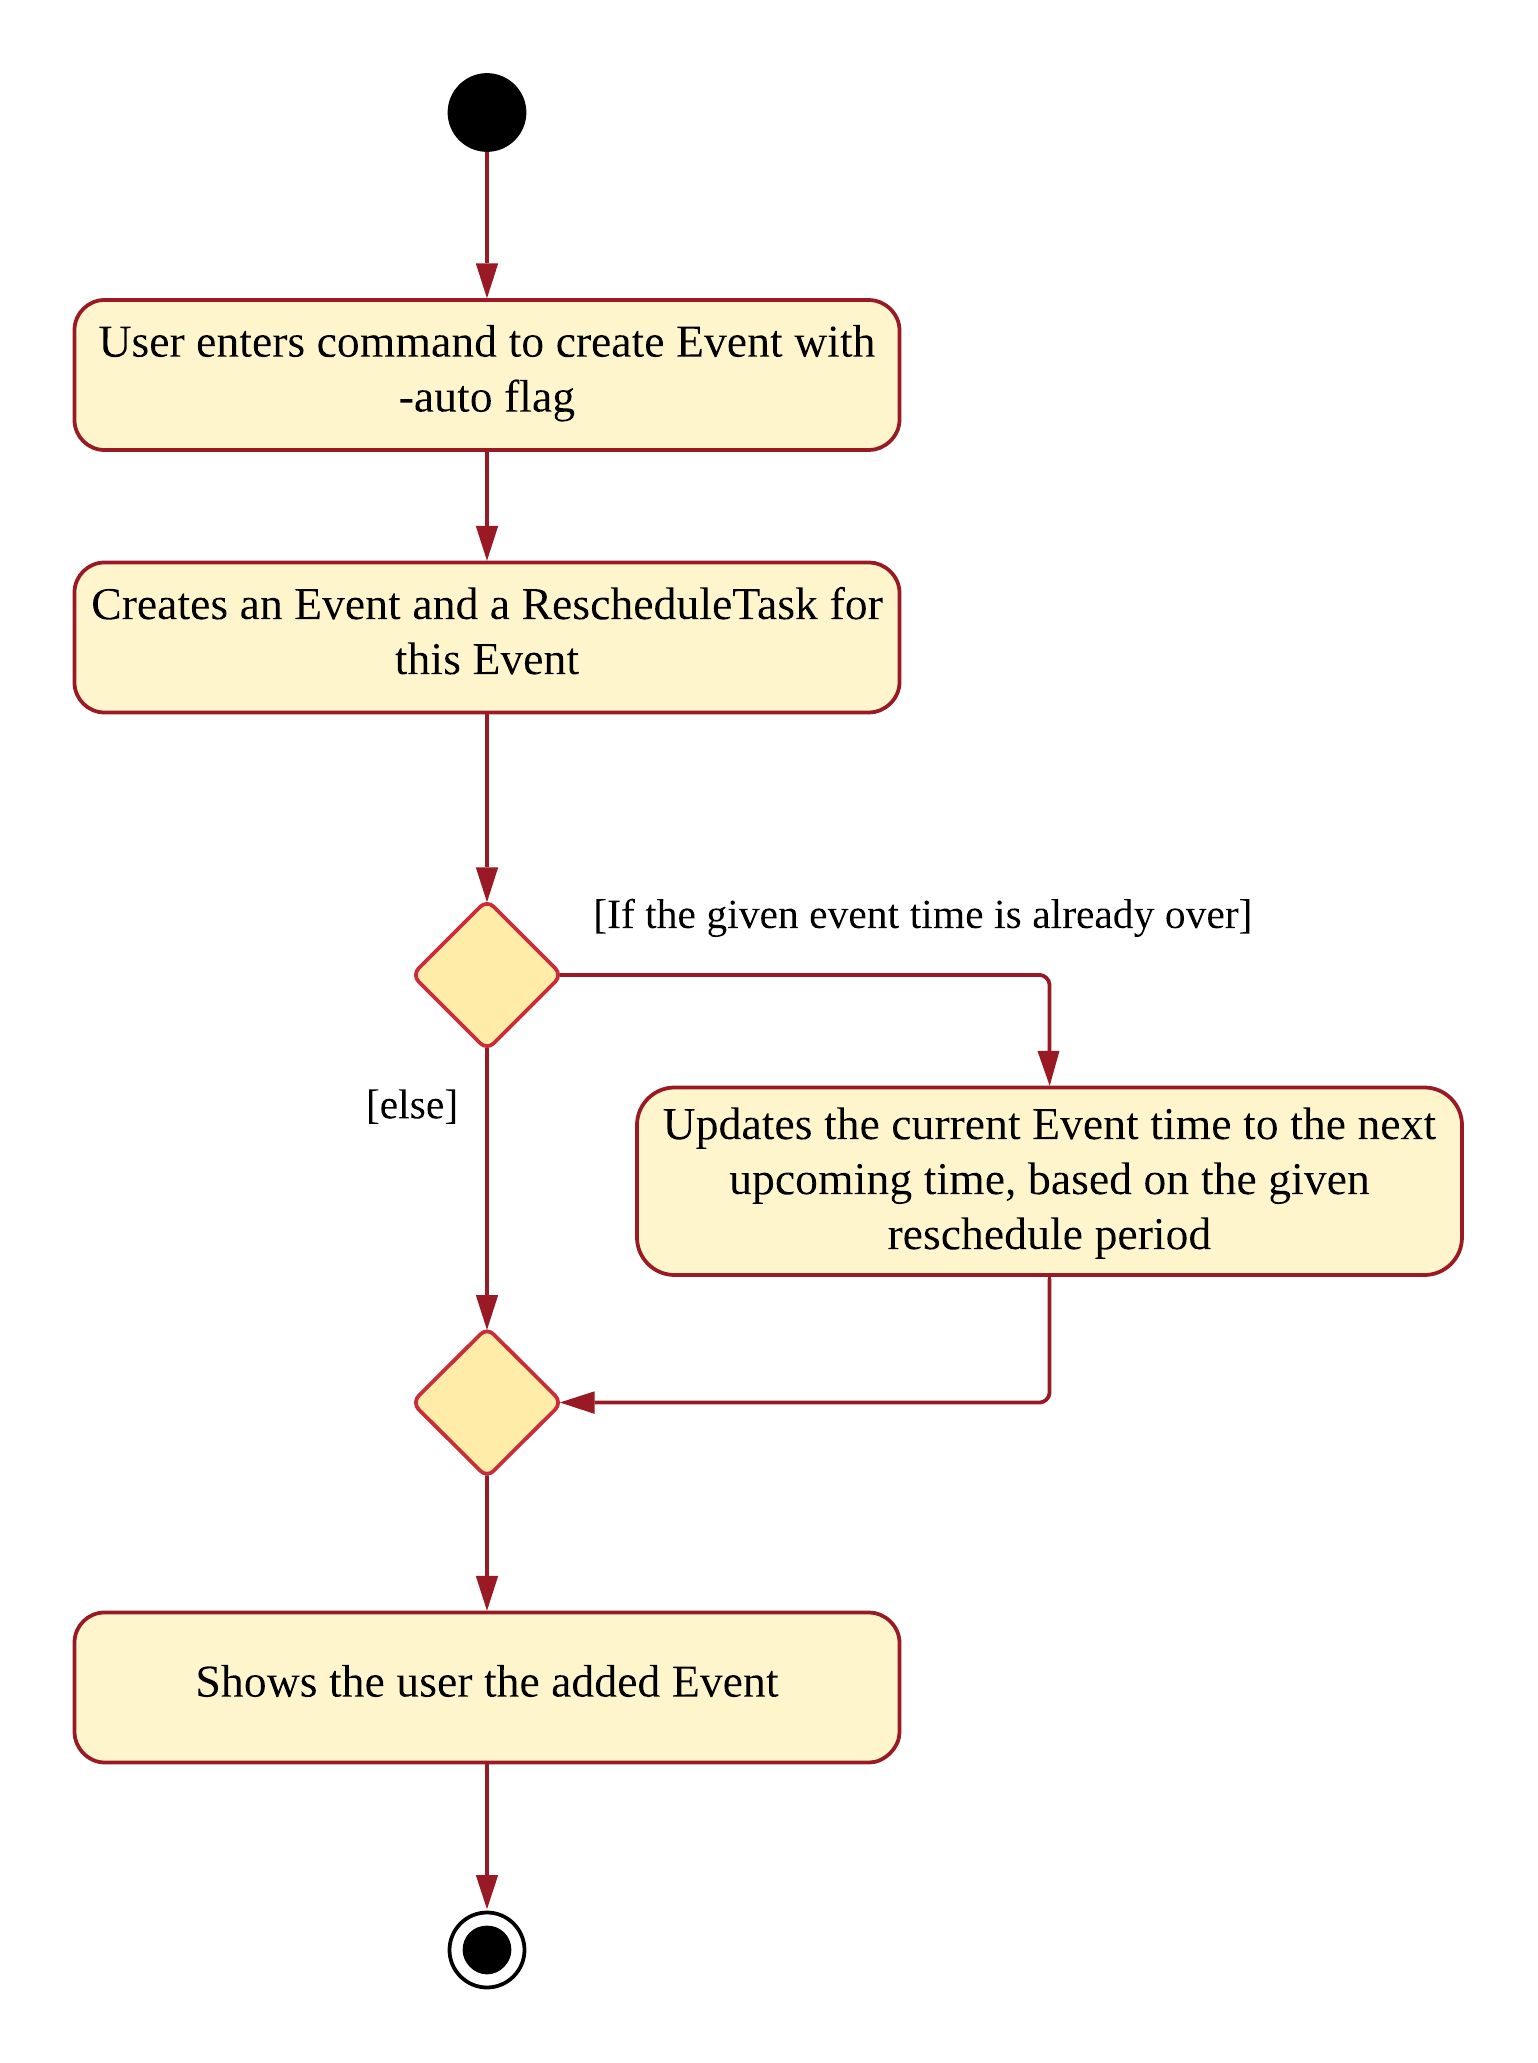
In the diagram, when we add the Event initially, we would check the start time of the Event and update it accordingly. However, this is not the only place where rescheduling occurs.
3 places where rescheduling can occur:
-
When the event is created, as shown in the diagram above.
-
While the app is running, the Event’s start time will be continuously updated when it has passed.
This is done usingTimerandTimerTask, usingTimer#scheduleAtFixedRate(). -
When the app is started and Events are loaded from the storage. The stored Event time might already be over, as such the time has to be updated to the latest upcoming one.
To illustrate how they work, first we need to know what classes are involved before we can understand the sequence of actions carried out.
The classes involved in the above rescheduling are:
-
AutoReschedulePeriod— Represents the period of every reschedule (eg day/week/month) -
RescheduleTask— Represents the action to perform when rescheduling its associated event. -
AutoRescheduleManager— Manages all the rescheduling tasks. There is only one of such manager.
To better understand its underlying structure, we can look at the class diagram below:
3.8.2. Internal workings of the command
Now we are ready to look at the sequence of actions. Given below is an example usage scenario of how add behaves at each step:
Step 1. The user enters the command event CS2103T Quiz -d 23/09/2019 2359 -auto week.
Step 2. The Event is created, following the sequence of steps in the section Adding Task/Event. However there are now some extra steps from Step 3 onwards that occur concurrently from the object creation of Event.
Step 3a. The presence of the -auto week creates an AutoReschedulePeriod, which is stored in the Event created. This can be seen in the Class Diagram above.
Step 3b. If the start time of this Event is already over, the Event’s start time will be modified to show the next start time, using this Event’s AutoReschedulePeriod.
Step 4. When LogicManager#execute(model) is called, the presence of AutoReschedulePeriod in the Event triggers the creation of a RescheduleTask, which represents the task of rescheduling this Event.
Step 5. This RescheduleTask is added to an AutoRescheduleManager, which manages all RescheduleTasks.
Step 6. When the start time of this Event has passed, AutoRescheduleManager will call RescheduleTask#run(), and this updates the Event start time, which will be reflected in the Ui.
The following diagrams show how the command event Quiz -d 10.hour.later -auto week is executed from the Logic component.
The first diagram shows the adding of an Event, which may appear familiar as it has a sequence similar to the adding of task in Section 3.1, “Add Task/Event feature”. However, there are some minor differences due to the presence of -auto which should be noted.
As mentioned, the key points to take note of in the diagram above is Event#setAutoReschedule(true) and Event#setReschedulePeriod(period).
The significance of these methods will be shown in the continuing diagram below:
From the above diagram, we can see that the presence of AutoReschedulePeriod in Event results in the creation of RescheduleTask which would be queued into the Timer managed by AutoRescheduleManager.
3.8.3. Design considerations
The design considerations for the classes are shown below:
Alternatives: |
Pros: |
Cons: |
Creating a AutoRescheduleManager for every RescheduleTask |
Easy for the Timer in AutoRescheduleManager to keep track of its TimerTask. |
There could potentially be many Timer threads. |
(Current) Singleton pattern for AutoRescheduleManager |
Ensure that only one instance can be instantiated as there should only be one manager for all the RescheduleTask. If there are multiple managers, it would be hard to keep track of all of them and it would be difficult to coordinate all the tasks. |
Difficult to create tests for AutoResheduleManager. Could have many hidden dependencies, which makes code harder to maintain. |
3.9. Add Reminder feature
Step 1. The user enters the command "reminder John’s Birthday -r 3.day.later".
Step 2. The LogicManager creates an ELISAParser to parse the user input.
Step 3. ELISAParser creates a AddReminderCommandParser which parses the input and returns an ReminderCommand.
Step 4. LogicManager will execute the ReminderCommand. AddCommand will then invoke ItemModel#add(Item), which adds the Item that contains the reminder to the RemindersList and the futureRemindersList.
Step 5. Each time an Item is added to the futureRemindersList, the Items in futureRemindersList is sorted according to the occurrenceDateTime of its Reminder in order of recency.
Step 6. AddCommand will also trigger a change in view by calling ItemModel#setVisualList(taskList)
Step 7. Upon the successful execution of AddCommand, a CommandResult is returned to the LogicManager, which will then be returned to the Ui to render the appropriate view.
When the application is launched, the LogicManager also creates a separate thread using the ScheduledThreadPoolExecutor that constantly runs checkTask every 5 seconds.
CheckTask is a runnable that monitors the ItemModelManager to see if there are any reminders in futureRemindersList that have an occurrenceDateTime after LocalDateTime#now().
If there is, it transfers those reminders to activeRemindersList which is an ObservableList.
Meanwhile, the MainWindow binds a listener activeRemindersList in order to observe if any Items with Reminders have been added to it.
If so, it will add ReminderDialogBox with the appropriate details for the added Items to the resultDisplay.
3.10. Snooze Reminder feature
We can see how snooze is performed through the activity diagram below.
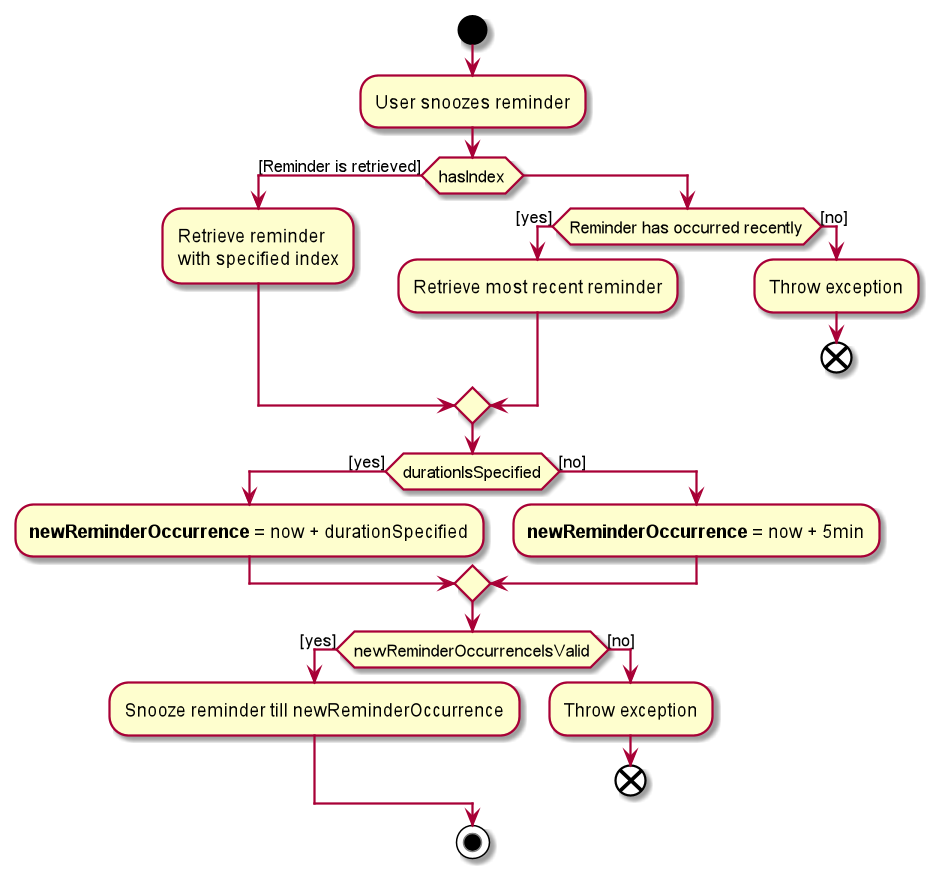
From the image above, we can see that there 2 guard conditions.
The first checks whether there is a reminder to snooze (either via an index or recently occurred reminder). If there isn’t, an exception is thrown.
The second checks if the newReminderOccurrenceIsValid (i.e. reminder does not occur in the past). Otherwise, it throws an exception.
If the duration of the reminder is not specified, then the default duration for the snooze is 5 minutes.
3.11. Logging
We are using java.util.logging package for logging. The LogsCenter class is used to manage the logging levels and logging destinations.
-
The logging level can be controlled using the
logLevelsetting in the configuration file (See Section 3.12, “Configuration”) -
The
Loggerfor a class can be obtained usingLogsCenter.getLogger(Class)which will log messages according to the specified logging level -
Currently log messages are output through:
Consoleand to a.logfile.
Logging Levels
-
SEVERE: Critical problem detected which may possibly cause the termination of the application -
WARNING: Can continue, but with caution -
INFO: Information showing the noteworthy actions by the App -
FINE: Details that is not usually noteworthy but may be useful in debugging e.g. print the actual list instead of just its size
3.12. Configuration
Certain properties of the application can be controlled (e.g user prefs file location, logging level) through the configuration file (default: config.json).
4. Documentation
Refer to the guide here.
5. Testing
Refer to the guide here.
6. Dev Ops
Refer to the guide here.
Appendix A: Product Scope
Target user profile:
-
has a need to manage a large number of tasks
-
needs reminders to take breaks or move on to finish all their work
-
prefers to be more organized with their time and tasks
-
prefer desktop apps over other types of apps
-
prefers typing over mouse input
-
can type fast
-
is reasonably comfortable using CLI apps
Value proposition: manage time and tasks more efficiently than a typical mouse/GUI driven app
Appendix B: User Stories
Priorities: High (must have) - * * *, Medium (nice to have) - * *, Low (unlikely to have) - *
| Priority | As a … | I want to … | So that I can… |
|---|---|---|---|
|
user |
add a new task |
record tasks that need to be done 'some day' |
|
user |
mark a task as done |
keep track of my remaining tasks |
|
user |
delete a task |
remove tasks that I no longer need |
|
student |
add deadline to a task |
remember my task deadlines |
|
user |
find upcoming tasks |
decide what needs to be done |
|
user |
find a task by description |
find only the tasks that are relevant to me at that point in time |
|
new user |
view more information about a command |
learn how to use various commands |
|
forgetful student |
be reminded of deadlines |
remember to complete them before they are due |
|
user |
type my commands in the text |
use the app without needing the mouse |
|
user |
use the undo function |
reverse any changes I made by mistake |
|
busy student |
see my reminders as notifications |
be reminded of them even in other applications |
|
user with many tasks |
sort tasks by priority |
identify which tasks require my immediate attention |
|
student |
turn on priority mode |
focus on only one pressing issue at a time |
|
user |
have a software that saves after every action |
will not lose information even if I close the program by accident |
|
user |
look at a summary of all deadlines in the calendar |
see when I am free |
|
user |
edit the date of a deadline |
fix my mistakes if I type the wrong command |
|
stressed student |
ask ELISA to tell a joke |
feel less stressed when my assistant has a sense of humour |
|
user |
colour code my calendar events |
easily categorise and differentiate between them |
{More to be added}
Appendix C: Use Cases
(For all use cases below, the System is ELISA and the Actor is the user, unless specified otherwise)
Use Case 001: Marking a task as done
MSS
-
User enters the command to show the task list.
-
ELISA shows the task list to the user.
-
User marks the task as done by using the index of the task.
-
ELISA updates the task list.
-
ELISA shows the updated task list to the user.
Use case ends.
Extensions
-
2a. The task list is empty.
Use case ends.
-
3a. The given index is invalid.
-
3a1. ELISA shows an error message.
Use case resumes at step 2.
-
Use Case 002: Adding a task
MSS
-
User creates a new task with a description.
-
ELISA informs the user that the task has been added.
Use case ends.
Extensions
-
1a. User can add deadline.
-
1a1. ELISA informs the user that a deadline has been added to that task.
Use case ends
-
-
1b. User can add a reminder date.
-
1b1. ELISA informs the user that a reminder has been added to that task.
Use case ends
-
-
1c. User enters an empty description.
-
1c1. ELISA informs the user that the description cannot be empty.
-
1c2. User enters a non-empty description
Use case resumes at step 2
-
-
a. At any time, User can view the task from the task list or the calendar view.
-
b. At any time, User can add a deadline to the task
-
c. At any time, User can add a reminder to the task
Use Case 003: Deleting a task
MSS
-
User enters the command to show the task list.
-
ELISA shows the task list.
-
User request to delete a task based on its index.
-
ELISA deletes the task from the task list.
-
ELISA shows the updated task list.
Use case ends.
Extensions
-
2a. The task list is empty.
Use case ends.
-
3a. The given index is invalid.
-
3a1. ELISA shows an error message.
Use case resumes at step 2.
-
Use Case 004: Snooze a reminder
MSS
-
User enters the snooze command.
-
ELISA snoozes the reminder.
-
ELISA reminds the user of that reminder after the specified duration.
Extensions
-
1a. There are no recent reminders to be snooze
-
1a1. ELISA displays an error message.
Use case ends.
-
-
1b. The user does not which reminder to snooze.
-
1b1. ELISA snoozes the most recent reminder.
-
Use case resumes at step 2.
-
1c. The user does not specify how long to snooze.
-
1c1. ELISA snoozes the reminder for a default duration.
-
Use case resumes at step 2.
Use Case 005: Find upcoming reminders.
MSS
-
User enters the command to show the reminder list.
-
ELISA shows the reminder list.
-
User enters command to sort reminders by date and time.
-
ELISA shows the updated list of reminders sorted by date and time.
Use Case 006: Search for a task by its description
MSS
-
User enters the command to show the task list.
-
ELISA shows the reminder list.
-
User enters command to find all matching tasks with the given search term(s)
-
ELISA shows a list of tasks with descriptions matching the search term(s)
Extensions
-
4a. There are no matching tasks
-
4a1. ELISA shows that there are 0 items listed
Use case ends.
-
Use Case 007: Undo the last command
MSS
-
User enters the undo command.
-
ELISA reverts the last executed command.
-
ELISA displays a confirmation message.
Extensions
-
2a. There are no commands to be undone
-
2a1. ELISA displays an error message.
Use case ends.
-
Use Case 008: Using Priority Mode
MSS
-
User enters the command to enter priority mode.
-
ELISA hides all tasks except the one with the highest priority.
-
User enters command to set that task as done once they finish it.
-
ELISA shows the next highest priority task.
Extensions
-
1a. User is not viewing the task list
-
1a1. ELISA displays an error message
Use case ends. {More to be added}
-
Appendix D: Non Functional Requirements
-
Should work on any mainstream OS as long as it has Java
11or above installed. -
Should be able to hold up to 1000 tasks / events / reminders (combined) without a noticeable sluggishness in performance for typical usage.
-
A user with above average typing speed for regular English text (i.e. not code, not system admin commands) should be able to accomplish most of the tasks faster using commands than using the mouse.
{More to be added}
Appendix F: Product Survey
Product Name
Author: …
Pros:
-
…
-
…
Cons:
-
…
-
…
Appendix G: Instructions for Manual Testing
Given below are instructions to test the app manually.
| These instructions only provide a starting point for testers to work on; testers are expected to do more exploratory testing. |
G.1. Launch and Shutdown
-
Initial launch
-
Download the jar file and copy into an empty folder
-
Double-click the jar file
Expected: Shows the GUI with an empty set of tasks. The window size may not be optimum.
-
-
Saving window preferences
-
Resize the window to an optimum size. Move the window to a different location. Close the window.
-
Re-launch the app by double-clicking the jar file.
Expected: The most recent window size and location is retained.
-
G.2. Adding a task
-
Adding a task while on the task list panel
-
Prerequisites: Switch to the task list panel using the
show Tcommand. -
Test case:
task testcase
Expected: A task with the description "testcase" is added to the task list panel. The priority of the task is medium (the default value). -
Test case:
task testcase 2 -p high
Expected: A task with the description "testcase 2" and of high priority is added to the task list panel.
-
-
Adding a task while not on the task list panel
-
Prerequisites: Switch to the event list panel using the
show Ecommand. -
Test case:
task testcase 3 -p low -d 1.min.later
Expected: ELISA will automatically switch to the task list panel and a new task with the description "testcase 3" and priority low should be added to the task list panel.
-
-
Adding a task that already exists
-
Prerequisites: The task list panel must already be populated and a task on the list is already know.
-
Test case:
task testcase(in this case, we are using one of the earlier test case)
Expected: Elisa will prompt you that the task already exist in the list and cannot be added. -
As an additional test case, you can mark a current task as done and then try adding that task into ELISA again. ELISA will still flag it as a repeated object despite the different state of completeness.
-
| Even though this is for task, the same tests can be used for testing events and reminders. |
G.3. Deleting a task
-
Deleting a task while all tasks are listed
-
Prerequisites: Switch to the task list panel using the
show Tcommand. There should be multiple tasks in the list -
Test case:
delete 1
Expected: First task is deleted from the list. Details of the deleted task will show in the result display. -
Test case:
delete 0
Expected: No task is deleted. Error details shown in the result display. -
Other incorrect delete commands to try:
delete,delete x(where x is greater than the size of the list),delete y(where y is a negative index)
Expected: Similar to previous.Even though this is for task, the same tests can be used for testing events and reminders.
-
G.4. Adding a reminder
-
Adding a reminder
-
Prerequisites: Know the current date and time. Volume of computer is audible to tester.
-
Test case:
reminder John’s Birthday -r 1.min.later
Expected: View is switched to reminder list panel (if not already there). A reminder is added to the reminder list. Details of the reminder will be shown in the result display. After 1 minute, a chime is played and a red dialog box with the details of the reminder will appear in the result display. -
Test case:
reminder John’s Birthday -r x(where x is the date and time 1 minute later from now in the formatdd/MM/yyyy HHmm. E.g.reminder John’s Birthday-r 15/11/2019 1800) Expected: Similar to previous test case. (Since x is 1 minute from now.) -
Test case:
reminder John’s Birthday -r y(where y is the date and time 1 minute later from now in the formatyyyy-MM-ddTHHmm. E.g.reminder John’s Birthday-r 2019-11-15T18:00) Expected: Similar to previous test case. (Since y is 1 minute from now.) -
Test case:
undo(used after one of the above has taken place) Expected: ELISA will reverse the addition of the reminder and no reminder will occur later on. -
Test case:
redo(used after a valid undo command has taken place) Expected: ELISA will reverse the undo of the addition of the reminder and a reminder will occur at the appropriate time. Note that if the time for the reminder to occur has already passed, the reminder will not occur. -
Test case:
reminder John’s Birthday -r z(where z is the date and time 1 minute before now in the formatdd/MM/yyyy HHmm. E.g.reminder John’s Birthday-r 15/11/2019 1358) Expected: No reminder is added. Error details shown in result display. (Since z is 1 minute before now.)
-
G.5. Snoozing a reminder
-
Snoozing a reminder
-
Prerequisites: Reminder has been added. Know the current date and time. Volume of computer is audible to tester.
-
Test case:
snooze 1
Expected: First reminder of the reminder list will occur again five minutes from now. -
Test case:
snooze 1 -s 1.min.later
Expected: First reminder of the reminder list will occur again one minute from now. -
Test case:
snooze 1 -s x(where x is the date and time 1 minute later from now in the formatdd/MM/yyyy HHmm. E.g.reminder John’s Birthday-r 15/11/2019 1800) Expected: Similar to previous test case. (Since x is 1 minute from now.) -
Test case:
snooze John’s Birthday -s y(where y is the date and time 1 minute later from now in the formatyyyy-MM-ddTHHmm. E.g.reminder John’s Birthday-s 2019-11-15T18:00) Expected: Similar to previous test case. (Since y is 1 minute from now.) -
Test case:
undo(used after one of the above has taken place) Expected: ELISA will reverse the snoozing of the reminder and reminder’s occurrence date time will revert to it its state before the snooze. -
Test case:
redo(used after a valid undo command has taken place) Expected: ELISA will reverse the undo of the snoozing of the reminder and a reminder will occur at the appropriate time. Note that if the time for the reminder to occur has already passed, the reminder will not occur. -
Test case:
snooze John’s Birthday -s z(where z is the date and time 1 minute before now in the formatdd/MM/yyyy HHmm. E.g.reminder John’s Birthday-s 15/11/2019 1358) Expected: No reminder is snoozed. Error details shown in result display. (Since z is 1 minute before now.)
-
G.6. Editing a task
-
Editing a task while all tasks are listed
-
Prerequisite: Switch to the task list panel using the
show Tcommand. There should be at least one task in the list -
Test case:
edit 1 -p high
Expected: The priority of the first task is changed to high (if the original priority of the task is already high, try other priority). -
Test case:
edit 1 -desc testcase
Expected: The description of the first task should change to "testcase". -
Test case:
edit 1 -d 1.min.later
Expected: A new event should be created for the task. You can verify by switching to the event panel or opening the task using theopen 1command. -
Test case:
edit 1 -p high -d 2.min.later
Expected: A new event should be created for the task (if it does not already exist) or the time of the event will be updated. The priority of the task will also change. -
Test case: Try different variation of the edit command to ensure that it works.
-
-
Editing a task to another task that is in the list
-
Prerequisite: Switch to the task list panel using the
show Tcommand. There should be at least two task in the list. -
Test case: Attempt to edit the first task such that it is the same as the second task. For example, if the second task has a description "testcase" and a priority of high, run
edit 1 -desc testcase -p high.
Expected: ELISA will feedback that the task already exists and will prevent you from editing.
-
-
Editing a task to remove the task
-
Prerequisite: Switch to the task list panel using the
show Tcommand. There should be at least one task in the list. -
Test case:
edit 1 --tkwhen the task has an event and/or reminder.
Expected: ELISA will remove the task from the task list but the event and/or reminder will still be viewable in the event/reminder panel. -
Test case:
edit 1 --tkwhen the task has no event and no reminder. Expected: ELISA will prompt that you cannot edit an item such that it has no task, event or reminder and the task will not be removed from the task list.
-
| Even though this is for task, the same tests can be used for testing events and reminders. |
G.7. Undoing/Redoing previous commands
-
Undoing when no
UndoableCommand(s) have been executed-
Prerequisites: Open the application and do not execute any add, edit, delete, priority or show commands
-
Test case:
undo
Expected: No changes to be undone. Error message shown in chat box. -
Test case:
redo
Expected: No undo commands to be redone. Error message shown in chat box.
-
-
Undoing when
UndoableCommand(s) have been executed-
Prerequisites: Open the application and execute some commands like adding/removing items, changing done/not done of tasks, modifying dates/descriptions
-
Test case:
undo
Expected: Last executed change should be reverted. -
Test case:
redo
Expected: Last undone change should be re-applied -
Other test cases: You can
undoandredomultiple times in either direction to remove and apply changes.
-
-
Redoing when previous
UndoCommand(s) exist but are not the last executed-
Prerequisites: Execute at least one
UndoableCommand, followed by one or moreUndoCommand(s), and then anotherUndoableCommand -
Test case:
redo
Expected: Should not be able to redo as the undo/redo command history has changed. Error message shown in chat box. === Game mode testing
-
-
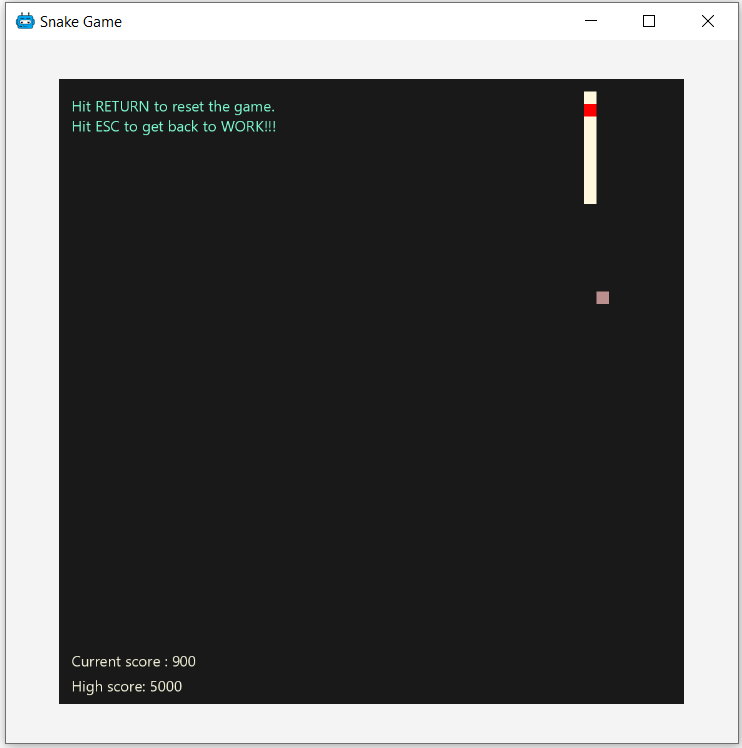
Test case:
game
Expected: Enters easy mode of game (Refer to figure above) -
Test case:
game e
Expected: Same as above. -
Test case:
game EASYExpected: Same as above.
-
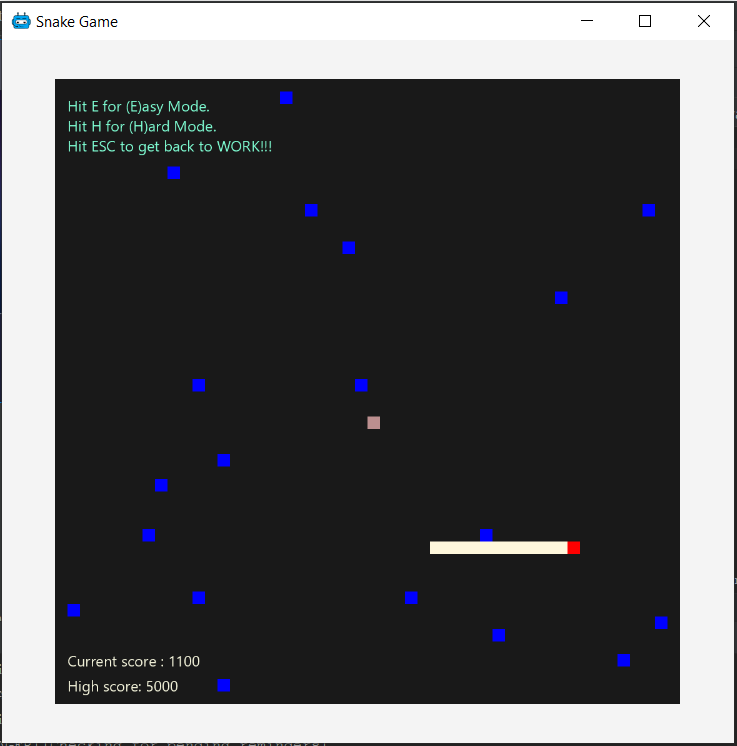
Test case:
game H
Expected: Enters hard mode of game (Refer to figure above) -
Test case:
game hard
Expected: Same as above.
G.8. Change theme testing
-
Changing theme of ELISA
-
Prerequisites: You must be in a different theme from the theme you are switching to before you can see the change.
-
Test case:
theme whiteExpected: Change ELISA’s theme to white.
-
G.9. Priority mode testing
-
Toggling on priority mode
-
Prerequisites: Switch to the task list panel using the
show Tcommand. There should be at least 1 incomplete task in the list and priority mode should be disabled at the moment. -
Test case:
priority
Expected: The ELISA icon will turn red and only one task will be shown on the task list panel. You can try switching a panel (show E) or adding an event to make sure it works. -
Test case:
priority -f
Expected: Same as above, except this time switching of panel or adding an event is not allowed. -
Test case:
priority 1.min.later -f
Expected: Same as above, except this time priority mode will deactivate after 1 minute. -
Test case:
priority -dExpected: Flag not recognized and ELISA will reject the command.
-
-
Toggling off priority mode
-
Prerequisites: Switch to the task list panel using the
show Tcommand. Priority mode is already activated. -
Test case:
priority
Expected: Deactivate priority mode and show you all your tasks. -
Test case:
priority 1.min.later,priority -f
Expected: Same as above.
-
-
Manipulate list while in priority mode
-
Prerequisites: Switch to the task list panel using the
show Tcommand. Priority mode is already activated. -
Test case:
done 1
Expected: ELISA will mark the task as done and generate the next task. If there is no next task, ELISA will automatically take you out of priority mode. -
Test case:
delete 1
Expected: ELISA will delete the task and generate the next task. If there is no next task, ELISA will automatically take you out of priority mode. -
Test case:
edit 1 -p low(most effective for a task list with more than 1 task and the current task priority is high/medium)
Expected: ELISA will edit the priority of the current task to low (any other priority can be used). A new task with a higher priority will be generated. -
Test case:
undo(used after one of the above has taken place)
Expected: ELISA will reverse the previous process and the old task will be generated again. -
Test case:
redo(used after an undo command)
Expected: ELISA will reverse the undo command and a new task is generated. -
Other test cases: You can try doing all of these commands in focus mode
priority -fto ensure that they work. When in focus mode, you can try some of the banned command likeshow,gameetc to make sure that it does not work.
-
G.10. Saving data
-
Checking that ELISA saves the data properly
-
Copy
ELISA.jarto a new directory and open it. This is to ensure that there is no old data file. An empty ELISA will be displayed. Type some sample data into ELISA and you will notice that a data file has been created at the pathdata/itemstorage.json. You can open the file to see that the data has been added.
-
-
Dealing with missing/corrupted data files
-
To simulate a missing data file, start up ELISA. ELISA will create a data file for you as
data/itemstorage.json(this is the default name of the storage file). Close ELISA and delete the itemstorage.json file. Re-open ELISA and ELISA will start with a new and empty data file. Verify it atdata/itemstorage.json. -
To simulated a corrupted data file, start up ELISA. Type some test input into ELISA. Close ELISA. Open the
data/itemstorage.jsonfile and edit some of the fields there. Open ELISA again. ELISA will realize that the data is corrupted and will generate a new data file for you.
-
{ more test cases … }